Monday, March 31, 2014

Three

Again this year I am blown away by the fact that my kid had a birthday. Is that going to happen every year? I just don't know how it is possible that we have a three year old, despite the obvious passing of time. Another year closer to pre-K, and school buses, and bike riding and all of those big boy things that will future cement the fact that our Bean is not even close to being a baby. It should be obvious since he is huge and talks like he's twelve, but it's like I'm the last person to figure it out.

This year's birthday celebration was art themed, since we spend a good chunk of our time getting crafty, and he loves it! I also figured that since most of Jude's buddies have come to our craft workshops at least once, it would be an easy way to corral them all into something organized and almost noise/motion less for at least ten minutes. With 30 people in the house and gloomy weather all day, that was a necessity.

We did a little bit of prep every day the week before the party and Jude helped with a lot of it. That way it kept him happy and busy during the day and kept me from getting overwhelmed by last minute stuff! One nice thing about his being a big boy is that he is actually incredibly helpful! So now you can get ready for the barrage of party photos and details... or just skip it:)


We spent an afternoon splatter painting with watercolors, and the big sheets became the base for the invitations. They are based on the idea of a gallery opening notice, so I kept the texts and design very simple. I wanted it to be bold, but didn't want to obscure the spatter paints. We stuck with primary colors so that became the color scheme for everything else! If you'd like to order invites, please visit the shop!


I covered all of the kitchen art with art of our own to make a little family gallery wall. The hearts and truck drawing (yes, those are trucks spraying out a fire!) are Jude's, the peach is mine, and the scene in the window is E's. He's actually very artisitic (just don't tell him I told you).


Kitchen decor was really simple, just primary colored streamers and balloons, a paint brush banner wrapped around the light fixture, and inexpensive table cloths. I spread some kraft paper on the table for people to draw on, and the paint dripped mason jars were another kid craft project. Again, if you'd like to order a banner, you can visit the shop!


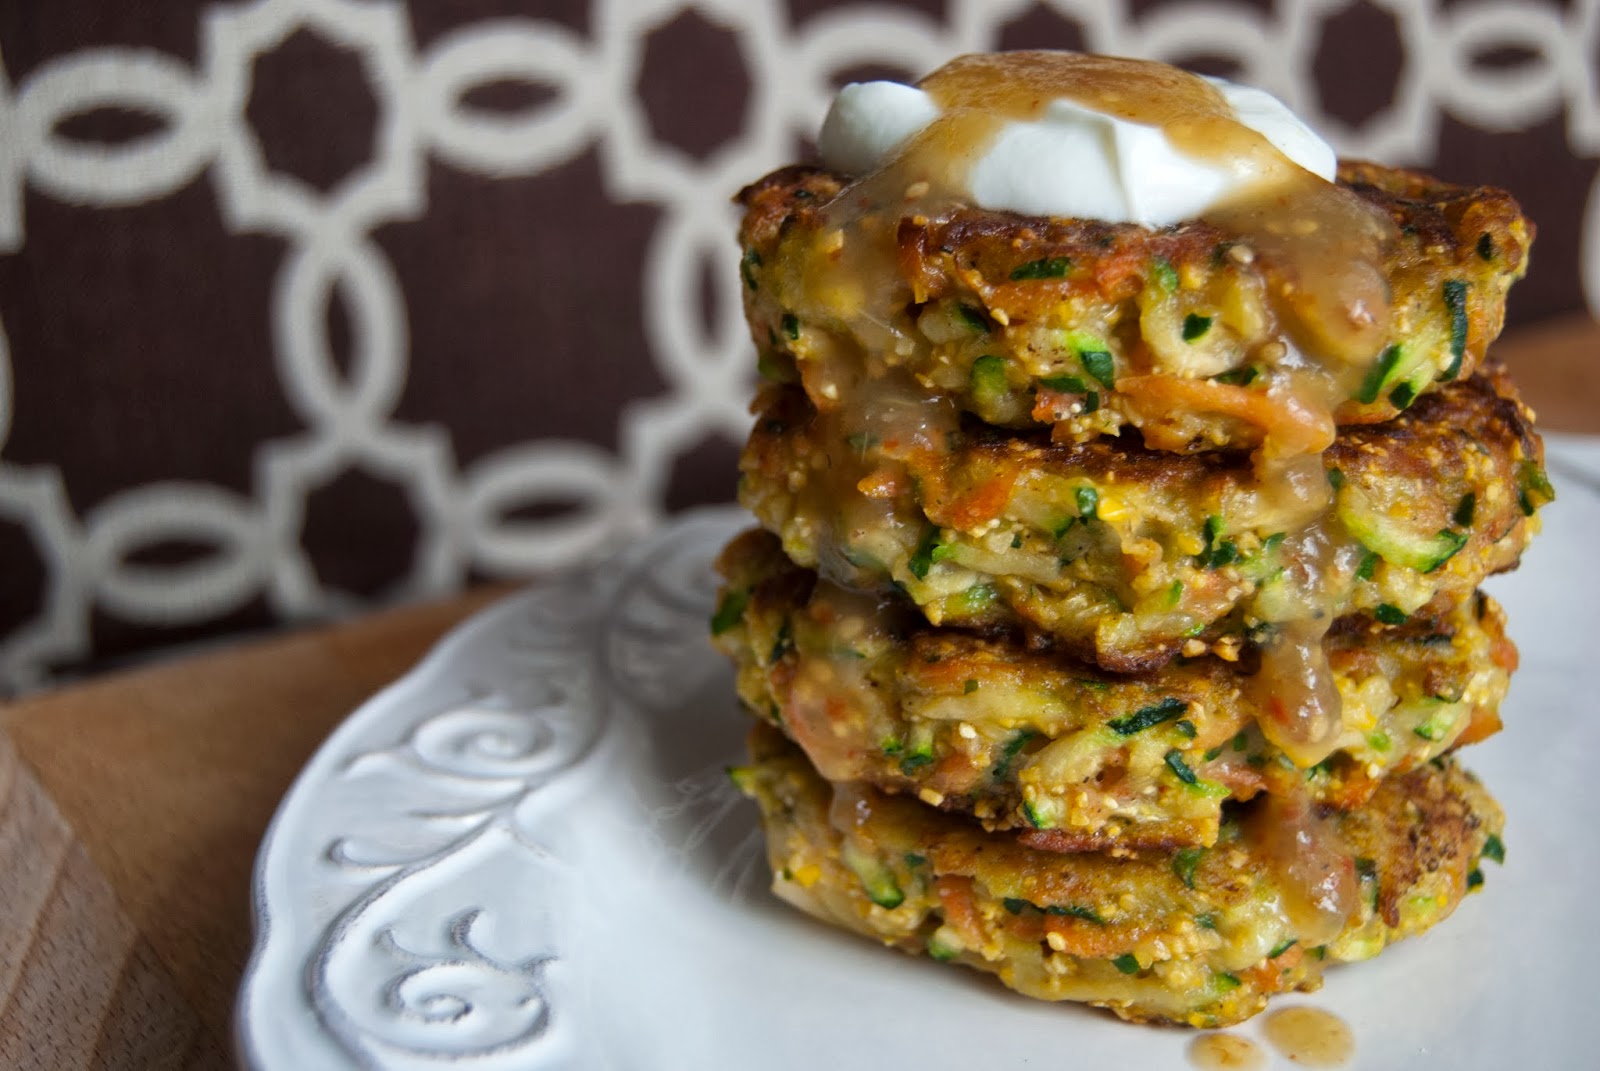
Food is obviously the most important part of any party, and we stuck with brunch items since it was early! Bagels and different spreads, a big fruit salad, danish in primary colors, mini strata cups (which were in the oven at the time I took this photo), "creative juices," a paint dripped cake, and parfait push pops.


The cake was a version of my mom's lemon layer cake, but only one layer was lemon. I added a layer of cherry filling and a layer of blueberry filling to follow the primary color theme.


It was gooood. This is all that's left, so I may be having it with coffee later!


I didn't have a lot of decorating to do in the craft room, either, since it is basically decorated all the time with giant tissue pom poms and banners, plus our big art display board. I hung some balloons and drew up a little faux gallery wall background on kraft paper during a "Call the Midwives" marathon one afternoon, and that was it.


The kids worked on monogram canvases, which was super fun, and they came out so cute! I used green painters tape to make it easier to pull off, and it was kind of a PIA honestly. Most of Jude's buddies have curvy initials, so cutting and lining up all of the pieces of tape for 13 canvases took me forever. It was the most time consuming thing of the whole party! In the end it was worth it, since it kept them busy and they all had a ready to hang work of art to take home in the end!


We spent another afternoon making playdough favors, which Jude loves. We used my favorite playdough recipe (which I will post later since I have a few tips to add to the original!) and colored it red, yellow, and blue. I added a little color blending chart (similar to the ones that are on the parfait stand) and stamped tags from the scrap paper leftover from cutting the invitations.


Don't know why I don't have a clear shot of these, so use your imagination!


I stenciled a shirt for Jude to wear with a Basquiat crown, since he's one of my favorite artists, and this is the only photo I have of it somehow! It's probably just as appropriate for my child to wear Basquiat as it is for him to wear his Old Dirty Bastard shirt, so I'm cool with it. Only one of the parents knew what is was anyway, so we didn't have to delve into how fitting it is to use my toddler to pay homage to one of the 27 club members.


And the obligatory blowing-out-the-candle shot. He didn't even spit on the cake! 
But he didn't eat it either. He still prefers bagels.

*If you like this post, please take a moment to head over to the party post on Project Junior
and show a little comment love or 
click the stars to add your rating! 

Saturday, March 15, 2014

Some like it hot


I mentioned that E has been training for the NYC half marathon for the last few months, which means I have been cooking carbs like crazy. Aside from pasta and pizza, these chicken and black bean enchiladas have made several appearances on the dinner table. We are a little obsessed. It had been ages since I made enchiladas, because they tend to feel like a little indulgent cheese bomb of heat, but they work out great for obsessive runners. Carbs, protein, veggies, boom. I now make a double batch and stick one in the freezer for another day cause I'm crafty like that.

I can't stress enough the difference it makes to have enchilada sauce from scratch. It's easy, cheap, and so much better than the canned stuff! One batch of this sauce easily makes a 9x13 pan of enchiladas (or two smaller pans like I make) and leaves extra for reheating leftovers. Once you make this you will never go back! The same goes for homemade refried black beans (which I'll post later so as not to clog your brain with too much tex-mex-amazement in one post).

Once you make the sauce, you can do anything you like to fill your enchiladas. I like to spoon a bit of sauce into the bottom of the baking dish and then brown the tortillas over an open flame (or the grill) to soften them up and give them a little toasty flavor. Fill each with your choice of fillings and a generous sprinkling of cheese before rolling and placing seam side down in the pan. Pour enchilada sauce over the whole pan and cover with another handful of cheese. Bake at 350 degrees for about 20 minutes, or until bubbly and browned on top.

Green Enchilada Sauce (two ways)
Ingredients:
1 lb. tomatillos
1 1/2 lbs. Cubanelle or Anaheim peppers
1 dried habanero pepper
3 cups chicken stock
1 tsp. dried oregano
2 cloves garlic, minced
2 Tbls. cornstarch
salt and pepper

Preparation:
Boil 1 cup of water in small pot. Drop the habanero pepper in and set aside to soak.

Preheat the broiler. Line a baking sheet with foil and spread the remaining peppers in a single layer. Broil, turning as needed, until softened and skin has blistered, about 15 minutes. Once cooled, remove skins, stems, and seeds and set aside. Drain the water from the habanero pepper, remove stem and seeds and set aside.

Peel and wash the tomatillos. Bring a large pot of salted water to a boil. Add the tomatoes and boil 5-7 minutes, until all of the tomatoes float to the surface. Drain and add to the bowl of a food processor. Add peppers and pulse until pureed.

Pour puree into a large sauce pan over medium high heat. Add stock, oregano, garlic, and salt and pepper to taste. Bring to a boil, reduce heat, and simmer 10 minutes.

Dissolve the cornstarch in a few Tbls. of warm water. Add to the tomatillo sauce, stirring, and return to a boil. Simmer an additional 5-10 minutes until sauce has thickened.

**When I make this sauce, I leave out the habanero until the end. That way most of the sauce is mild, perfect for making enchiladas for those who aren't heat crazed, or for a toddler with developing taste buds.
I reserve 1 1/2 cups of this sauce and then add it back to the food processor along with the habanero pepper. Pulse to combine and you have a nice spicy sauce that is a great accent to add over the top of the cooked enchiladas when serving.

Jude's first foodie photo bomb.

Wednesday, March 12, 2014

Baking with the Littles

Celebrating St. Patrick's Day for us has generally been the same as it is for most Americans. Beer. Stupid green outfits. Beer. Corned beef and cabbage for dinner. Beer. The parade. More beer.

Now that we have a toddler, things in the partying category have clearly jumped ship, and I started looking for other ways to celebrate the day. Since I'm only a quarter Irish and E is maybe a drop, it isn't a huge deal. My Irish grandmother passed away years before I was born, so I don't have any family recipes to pass on, or any traditions that are specifically Irish. I also am not ready to jump on board the "every little holiday is the new Christmas" bandwagon and deck the halls with shamrocks, build a leprechaun trap, or dye every bite of food green. That will start when Jude goes to school, so I'm giving myself a reprieve. In the meantime, we will have our corned beef and cabbage for dinner, and today we made this yummy Irish soda bread. No, it's not the kind you usually see studded with raisins and caraway seeds (which I will also make, but by myself, and which is an Irish American construct). This bread is more like what the Irish actually made in Ireland, before it came over here and got sweetened up. It is perfect for little helpers, because it doesn't contain any eggs and they can get elbows deep in dough if they want to. 

We used this recipe for craft class today, which became baking class, since we ended up with a very small group. Each kiddo got an apron and we took turns adding scoops to the big bowl, mixing, and making a general mess. I split the dough into equal parts and they shaped mini loaves, then cut the traditional cross shape into the tops before baking. It was really fun, even if Jude couldn't stop eating dough off of his fingers. Disgusting, but he swears it tastes good.

He ate his smeared with goat cheese and pickled beets for lunch. I had mine with butter and jam. It's a very simple bread without a ton of flavor, so this is more of a fun project than a go-to baking recipe. You can certainly mix it up by using different flours, adding seeds or dried fruit, etc. so get crafty and have some fun with it. Just please don't dye it green.

Traditional Irish Soda Bread
Ingredients:
3 1/2 cups of flour (we use whole wheat)
3/4 tsp. salt
1 tsp. baking soda
1 1/2 cups buttermilk

Preparation:
Preheat oven to 425 degrees. In a large bowl, mix dry ingredients. Add enough buttermilk to make the dough sticky, but not runny. Stir using a wooden spoon, or just use your hands! Turn dough out onto a floured surface and shape into a ball (or four small ones as we did). Cut a cross shape about halfway down into the ball with a knife and place on a baking sheet lined with parchment paper. Bake for 40 minutes (or 20 for the mini loaves), the bread is ready when you tap on the bottom and hear a hollow sound.

Wednesday, March 05, 2014

M's Honey Bear Baby Shower


We could start a rugby team with all of the new babies that have been born to our crew over the last few months. It's been a bonafide baby boom, and there appears to be no end in sight. My sister M will be the next mama to join the crew, welcoming her first bambino in just  a few weeks time. To celebrate, we had to throw her a baby shower fit for our cuddly baby bear to be, and it was a little too much fun. 

Typical of my craft addicted ways, I went slightly overboard making fun paper goods, but in the end it all looked so adorable that it was worth the last minutes of inky fingered mania. 

My mother made a gorgeous set of crib bedding for M in vintage teddy bear prints, and that became the inspiration for the party theme. Since Baby's gender is still a surprise, honey yellows and browns were a perfect neutral color scheme. I used as many personal touches as possible (that's Jude's favorite teddy in the center), and really wanted everything to be reusable  in the nursery (I think you all know how this girl hates to throw anything away).


The invitations, printed on plantable seed paper in lemon yellow and available here.

The favors were small jars of local honey made by my pal Leeann. They were a huge hit, wrapped in tulle and tied with plantable seed tags. You can find the honey bears in Lee's Etsy shop, and the tags in mine!


Each table was decorated with pint sized mason jars wrapped in kraft paper and tied with yellow striped bakers twine. Place settings were set with these fun game cards. Each had a Baby Shower Bingo game on one side and a Celebrity Baby Name Matching Game on the other. 


The gift table was adorned with paper pinwheels and little honey and bear themed baby onesies on a line. They were a last minute addition, so the onesies are just iron on images of designs used for other pieces of the decor! Hopefully they hold up through the many washing of a newborn babe! On the top of the table we set another of Jude's teddy bears with a large mason jar. The sign says "What will it bee?" and guests were asked to place their votes for Baby's gender. The majority vote was a boy, but I'm still holding on to hopes for a little lady!


No family party is complete without my mother's maids of honor, a recipe handed down from my great grandmother. They are my favorite thing on earth, and the inspiration for the Peanut Butter and Jelly Cupcakes I posted from E's birthday. Sadly, they had a bit of a mishap on the way to the party, and all of the cute coconut grass meant to be set beneath them on the stand ended up on top. My mom was a little bummed, but they still looked so cute! I made tiny paper flags for them and I still can't get over the perfect little bear candies she stuck on top. She found them at WalMart of all places.


And an obligatory 'smiley preggo opening presents' shot. 
Because no one is cuter than a pregnant girl, at least not until the baby is born.


Tuesday, March 04, 2014

New twists


I am going through a serious food boredom phase. Blergh. After I started the Bon Appetit Food Lover's Cleanse in January, I had a solid two weeks of being excited about everything I was cooking, followed by a quick plunge into carbaholic overload. This girl just can't get by without the occasional bagel with cream cheese, so a week of withstanding the temptations ended up leading me down the slippery slope into binge town. It has lasted about two months. Yup. That isn't to say I have eaten nothing but junk for two months, but I haven't been all that diligent. E is also training for the NY half marathon. His Sunday afternoons are taken up by 14 mile training runs, which means Sunday evening visits to our favorite pizza joint where we inhale penne ala vodka, grandma's pies, and garlic knots like our lives depend upon it. I do always order a salad, so there's that.

This ridiculously cold weather, constant snow, and desire to do nothing but cuddle on the couch with my kiddo doesn't help. It has all led to my feeling a bit blah, so I did a big fridge clean out, got back to my meal planning and borrowed some new workout DVD's from the library. Time to regroup. I'm kick-starting some new food fun with a couple of new recipes, including these fritters. I have seen all kinds of Paleo zucchini fritters floating around, but I'm just not ready to jump on board that Paleo train just yet (note the aforementioned carb addiction). They also all seemed to be lacking a bit in the flavor department, so I did some adjusting and ended up with a really delicious veggie packed fritter that you could serve as a main dish or a side. You can also make them smaller for little fingers and use them as a kid friendly snack. Love.


Carrot and Zucchini Fritters
Ingredients:
3-4 zucchini, to make 3 cups shredded
1 large carrot
1 small shallot
1 egg, beaten
1/4 cup flour
1/4 cup cornmeal
1 tsp. freshly ground black pepper
1 tsp. salt
1/2 tsp. cayenne
1/2 tsp. garlic powder
4 Tbls. butter

Preparation:
Using a food processor with a shredder blade (or a box grater), shred zucchini and place in a large bowl. Sprinkle with salt, toss to combine and set aside for a few minutes. Shred carrot and shallot and place in a separate bowl. Using your hands, squeeze all excess liquid from the shredded zucchini. There will be lots! Keep squeezing by handfuls even if you think you are finished! Add to the bowl with the carrot and shallot. Add flour, cornmeal, seasonings and egg and toss to combine.

In a large skillet, melt 2 Tbls of butter over medium high heat. Using a large batter scoop (about a 1/4 cup) scoop up the veggie mixture and press gently into the scoop to mold. Flip the scoop out into the hot pan and press lightly with your fingers to flatten. Don't crowd the pan, start with 4 or 5 fritters. Cook on one side until crisp and well browned, about 4-6 minutes. Flip and continue cooking until the other side is crisp and browned. Remove to a paper towel lined plate. Melt the remaining butter before adding more fritters to the pan. Serve hot with a dollop of plain yogurt and some hot sauce. That's habanero green enchilada sauce in the photo, to which I am currently addicted. That recipe can be found here!


Linked to Healthy Roots, Happy Soul, Premeditated Leftovers

Thursday, February 27, 2014

Happy Birthday, E!


Yesterday E turned another year older. Birthdays are kind of a big deal around here, but even more so since we had Jude. Having a kid has given me a new excuse to be ridiculous with any celebration that pops up, it just gets harder to top myself every year. This year Jude and I drew a giant birthday card for his annual "Happy Birthday, Daddy" Facebook photo, and as cute as it is, it still can't beat the original.


Anyhow, along with crating and photo taking antics, we had dinner at E's favorite Mexican place, followed by birthday cupcakes and candles. The perfect birthday cupcakes for someone who isn't into chocolate? PB and J of course. Nothing could stop me from whipping up a little bit of fudge frosting for the extra cakes, though. Because despite E's aversion, it isn't a birthday in my kitchen if there isn't some chocolate floating around.

These cupcakes began as a spin on an old family favorite, the maid of honor. They are a little pastry that my great grandmother made, then my grandmother, and now my mother is in charge. They have a pie crust base and a lightly sweet vanilla cake on top, with raspberry filling and almond frosting. No family event is complete without them. And though there are many versions of peanut butter and jelly cupcakes out there, most of them are missing the essential crust. This version has the lightly toasted crust, fluffy white bread-esque cake, a jam center and the fluffiest peanut butter frosting known to man.

Peanut Butter and Jelly Cupcakes
makes 18-20 cupcakes

Ingredients:
Filling:
1 cup strawberry, blueberry, or grape preserves
Crust:
1 1/2 sticks unsalted butter, cold and cut into cubes
3 c. all purpose flour
1 tsp. salt
1 Tbls. sugar
1/3 c. very cold shortening
1/2 c. cold water
Cake:
1 1/2 c. all purpose flour
1 tsp. baking powder
1 tsp. salt
1 c. sugar
1 stick unsalted butter, softened
3 large eggs, at room temperature
1 tsp. vanilla extract
3/4 c. buttermilk
Frosting:
1 c. peanut butter
6 Tbls. unsalted butter at room temperature
Pinch of salt
1 tsp. vanilla extract
1 c. confectioners sugar
1/2 c. cream

Preparation:
Grease muffin tins with butter and dust with flour.

Prepare crust. In the bowl of a food processor, pulse flour, salt, and sugar until combined. Add cold butter and pulse a few times until the butter resembles small peas. With the processor turned on, add the cold water a Tbls. at a time, until the dough forms a ball. Dump the dough onto a sheet of plastic wrap and knead into a ball. Wrap tightly in the wrap and refrigerate 30 minutes. Once chilled, slice dough ball in half and return one half to the refrigerator. On a floured board, roll the other half into a 1/4 inch thickness. Cut rounds using a biscuit cutter and press into prepared muffin tins. Repeat with the remaining dough.

In a small bowl, stir the jam until smooth. Spoon a generous teaspoon into the center of each muffin cup. Set aside.

Preheat oven to 350 degrees. In a medium bowl, sift together flour, baking powder, and salt.
In a large bowl, cream butter and sugar using a mixer. Add eggs and vanilla and beat until light and fluffy. Add flour mixture and milk gradually, alternating between additions and scraping down the sides of the bowl.
Pour batter into muffin cups, leaving 1/4 inch space from the top. This should be just enough to cover the jam.

Bake for 18-20 minutes, or until cakes are just golden. Allow to cool 5 minutes in the pans before inverting onto a wire rack to cool completely.

Prepare the frosting. Beat butter and peanut butter at medium speed until combined. Add vanilla, salt and sugar and beat until fluffy. Add cream and continue beating until pale and fluffy. Frost each cupcake and top with sprinkles if desired.

Friday, February 21, 2014

Triple Ginger


I think it is pretty safe to say that I am cookie obsessed. It's not a bad thing. Cookies cure everything from heartbreak to homesickness, boredom to the blues. My usual go-to mood booster cookie is chocolate chip, but when I want to mix it up a little I go for ginger. I absolutely love these Triple Ginger Cookies from Bon Appetit for their spice and snap. However, they are a little heavy on the molasses and I was looking for something a bit softer. See, E doesn't really do chocolate, and after our anniversary dinner at Le Bernardin, he is obsessed with mango gelato. For Valentine'd Day I had to make that gelato for dessert, but I couldn't serve it alone. It was served with little bits of crystallized ginger at the restaurant, so that was what inspired my hunt for a perfect ginger cookie. This one did it. Super soft on the inside, a little crisp on the outside, buttery and super gingery. The best part is that when kept in an airtight container, they were exactly as soft even a week later. No need to give them all away or scarf down 8 cookies in one sitting so they don't go to waste! You can dole them out as needed for a mood boost, and they are especially good on a gray, rainy day like this with a mug of hot tea.

Soft Baked Triple Ginger Cookies
from Theresa Sullivan
Ingredients:
3 tablespoons milk
1 tablespoon fresh grated ginger
2 1/4 cups all-purpose flour
1/2 teaspoon baking soda
1 teaspoon baking powder
1/2 teaspoon table salt
1 teaspoon ground ginger
1 1/2 cups sugar, plus 1/3 cup for rolling
2 ounces cream cheese, room temperature and cut into small pieces
6 tablespoons unsalted butter, melted and still warm
1/3 cup vegetable oil
1 large egg
1 teaspoon vanilla extract
1/2 cup chopped candied ginger

Preparation:
Preheat oven to 350°F. Line two baking sheets with parchment paper.
Combine milk & ginger in a small cup. Heat in microwave for about 20 seconds. Set aside to steep.
In a medium bowl, whisk together flour, baking soda, baking powder, salt and ginger. Set aside.
In a large bowl, blend together sugar and cream cheese. Blend in warm melted butter. Add oil, egg, milk steeped with ginger, and vanilla extract. Blend until combined. Fold in flour mixture with rubber spatula until incorporated and a soft dough forms. Fold in chopped candied ginger. Refrigerate dough for 30 minutes until it firms enough to roll into balls.
Place remaining 1/3 cup sugar in a small bowl. Using a 1 1/2 Tablespoon cookie scoop, portion out 12 dough balls per baking sheet. Roll each dough ball in your hands, then roll in sugar to coat. Space about 2 inches apart on the baking sheet.
Bake 1 sheet at time at 350°F for 11-13 minutes, until set and just beginning to brown on the bottom. (They might not look done, but don’t over bake!) Cool on the baking sheet for 3-5 minutes, then transfer to a wire rack to cool completely. Store in an airtight container at room temperature.

Thursday, February 20, 2014

The Little Bean Toddler Arts and Crafts Workshop - Winter Round-up

Back in the fall, I started running a little arts and crafts workshop for toddlers in our home day care. I knew the boy and I would start getting pretty antsy come winter, and although he has an awesome group of buddies, I wanted him to start interacting with some new people. Looking around at commitments and prices for the kiddie programs in the area left me feeling pretty bummed. $15 for an hour of open gym time? Or $35 for an art class once a week? I just couldn't justify it, especially since I knew we could plan something fun for ourselves with just a little time and money. 
I asked around, then made up a schedule and posted it to my Facebook page. Over the past few months our group has grown to include 18 mamas and their toddlers who pop in for classes. It's been so much fun, and my favorite part is watching all of them get to know each other. 

I try to use our favorite books as inspiration for our projects, so I thought I would share some of the things we have worked on so far this winter. We have had record breaking snowfall this year, so with all of the snow days, everyone is feeling a bit like caged animals. If you and your littles fall into that category as well, these are some fun activities for you to try out the next time you find yourselves deliriously house-bound.


The Snowy Day

One of my favorite winter themed picture books is The Snowy Day by Ezra Jack Keats. It's a classic, and it perfectly captures the fun and exploration of a small boy out playing with snow. The colors are bold and bright, and the story is a great length for toddlers from one year on up. 

Peter watches his footprints in the snow, makes tracks with a stick, watches some older boys have a snow ball fight, and  tries to keep one in his pocket. I figured a perfect project would be to make some of our own white playdough and set out different tools for the kids to explore with their "snow." They had a great time making little snow men and rolling out the dough and drawing tracks or stamping objects into it.

Ingredients for Perfect, Long Lasting Playdough:
1 cup water
1 cup all purpose flour
1 Tbls. vegetable oil
1/2 cup salt
1 Tbls cream of tartar

Instructions
In a pot over medium heat, stir water, oil, salt, and cream of tartat until warmed through. Remove from heat and stir in flour util combined. Turn out the mixture onto a board or countertop and knead until smooth. Store in an airtight container or ziploc bag for up to six months! If you find your dough dries out at all, try adding a teaspoon of water and kneading it again until it is soft.

Tools for creative play:
- a paper plate
- a ball of dough
- a small rolling pin (actually they are cylindrical wooden blocks!)
- a pine cone
- a craft stick
- small cookie cutters

Ice

Another incredible winter picture book is Ice by Arthur Geisert. It isn't a great read aloud book, because, guess what? It has no words. It's pictures tell the story of Geisert's familiar crew of pigs on a new adventure. They find an iceberg, and have to figure out how to carve it up and transport it. They make all kinds of crazy machines, and your little one could probably look through this book for an hour discovering all of the little details. We couldn't exactly carve ice with a bunch of 2 year olds, but I figured some ice painting would certainly be manageable!

Tools for creative play:
- An ice cube tray
- water
- food coloring
- craft sticks
- water color paper

Fill your ice cube tray with water and add drops of food coloring to each one. Obviously the more food coloring you add, the bolder your colors will be. Snip craft sticks in half and put one into each space in the tray. These will serve as handles. Let paint cubes freeze overnight.

I set out a sheet of watercolor paper for each kiddo on top of a big plastic table cloth and let them go at it. This is a fun activity for talking about hot versus cold, melting and freezing, and color blending. The kids made a huge mess, and created some very cool effects with their paints!

Snuggle Puppy

OK, so this one was a Valentine's Day themed story and project, but it doesn't have to be! Snuggle Puppy by Sandra Boynton is one of the first board books I ever read to Jude, and one I buy for every friend who has a new baby. There is also an adorable audio version of the story, sung by Eric Stoltz, that we like to listen to along with the book. Since it's February, we did love themed crafts to imitate the imagery and bold colors of this sweet little book. 

Bleeding art tissue paper is one of my favorite kiddie craft supplies. Unlike regular tissue paper, it is heavily pigmented and meant to get wet, so that the colors will bleed onto paper. We have done several projects with this paper and this time we paired it with pastels to create a resist.

Tools for creative play:
- Bleeding art tissue paper
- Heavy cardstock or watercolor paper
- Pastels or crayons

First we let the littles scribble a design on their watercolor paper (or the mamas drew something). It is important to use a heavy hand with the pastels or crayons here, because you want it to resist the water later! Then they spread pieces of bleeding tissue over the designs. It can help to use a bit of glue from a glue stick (nothing permanent!)  to keep the tissue bits in place, especially with a group of energetic kids! Once the image is covered, they used paintbrushes, cotton balls, and cotton swabs to bruch water over the surface of the tissue. Once dried, the tissue falls away leaving a watercolor effect behind, and the crayon image shows through.

Next up is one of our other favorite books, Perfect Square by Michael Hall, a collage art book that is so simple, but a fantastic invitation to create collage art in a small space. Class is tomorrow, so I will post some photos and share the steps for that project soon!

Do you have a favorite picture book that inspires you to create with your toddler? If so, please share it in the comments so I can look into it!


Friday, February 14, 2014

Happy Valentine's Day!


Oh hooray! It's here! The day that is the most equally loved and loathed holiday of the year! Well, whichever category you happen to fall into, you can't deny the ridiculously over-zealous holiday spirit that explodes across the internet over Valentine's Day. I recently discovered the vigor with which elementary school moms also debate the pros and cons of this day, thanks to my little town's Facebook page. The fury that candy isn't allowed in class was so hot I was laughing at each post (oh, and the turn the conversation took. Allergies, diabetes, obesity, oh my!). Then came  claims that kids were home crying because Valentine's Day parties would be postponed due to school closings. The horror! Might I share with you why or schools have closed two days this week? Take a gander:


That's our deck, people. I couldn't get out there if I tried. Roads are a disaster, schools and businesses are closed, and children across the county are wailing with sobs that their 4th grade party is postponed. Sigh. It's seriously time to get a grip people. 

While I love Valentine's Day (another excuse to snuggle my family, make treats, and send cards? It's right up my alley.), I certainly don't love the pushy, in-your-face bullshit of it. So, we'll be celebrating sans bullshit over here. We had a nice family breakfast (after E spent two hours digging our cars out) with heart shaped toads in a hole, fruit, and bacon. Jude hung out with a buddy this morning decorating cookies, and then we made mango ice cream for later. E doesn't really do chocolate, so we are having mango ice cream sandwiched between soft baked ginger sugar cookies tonight. They are DOPE, so I'll post that recipe tomorrow! Dinner will be Ina's Beef Bourguinon with garlic mashed potatoes. Simple, hearty winter food that's a bit special sine I never make it. We don't usually do gifts, but I did buy Jude a little something because I couldn't resist. 


Could you? I mean really. If you haven't seen the shop Her Bunnies Three and you have a little one, please do go over and visit! Her dolls are so adorable and she held a flash sale over the weekend. I scored a little blonde Mini Sweetie for Jude, which will be here any day. It will be his belated valentine, so he'll just get lots of extra kisses in the meantime.

So, how do you celebrate this so-called Hallmark holiday? Dinner out and roses? Scorn and Morrisey on repeat? Either way, I'd love to hear! I'm always gathering up ideas for next year!