Showing posts with label Baby Love. Show all posts

Friday, December 11, 2015

12 Days of Christmas: Take 2 - Button Trees!


Last winter my 12 Days of Christmas posts featured a new local Etsy shop or crafter. This year's 12 Days of Christmas features are kid focused, because duh. I spend every waking hour of my life with my own kids and/or someone else's, so there ya go. We have already been baking and decorating and crafting up a storm since the day we came home from our Thanksgiving long weekend, so I figured it is time to share some holiday cheer! All of the 12 posts will be quick and easy crafts, recipes, or books that have gone over well with my own kiddos or the 4 Little Bean's who come for care.

Day 1 is all about Button Trees! These are a great quick craft for littles of various ages. You don't need much and they also make cute gifts for teachers, babysitters and grandparents.

You need:
green and tan or orange popsicle sticks
buttons
glue
glitter (optional for some, but not us!)
string or an ornament hook

Arrange green sticks in a triangle and affix each corner with a dot or glue. Cut additional sticks to size for branches and attach with more glue. Cut tan/orange sticks in half to act as a trunk and affix with glue. Let this base dry before adding buttons! When it is dry, add button ornaments with more glue dots. I added the glitter with a spray of Alene's Spray Adhesive, but you can just use your regular glue for that! Once the glue is fully dry, it is ready to hang or gift!

Have a fun holiday craft to share? Link up in the comments!

Monday, September 28, 2015

An Apple A Day (and a few great books!)

Apple picking season is in full swing, and we (like everyone else and their mamas) went to the orchard this weekend. We brought home two pecks of apples, a half dozen cider donuts, and a bunch of gorgeous pumpkins in all shades, shapes and sizes. Fall is one of my favorite times of year, not just for the weather, foliage, and food, but for the projects. September is such an awesome time to be home crafting, reading and cooking with littles, and we do lots of it. Since we have so many apples on hand (as I'm sure some of you do), it's time for some baking, reading, and science(ing?).

Today we did the obvious apple sauce, since all the littlers were sleeping and it was just Jude and I. He's grown to be a great kitchen helper, so apple sauce only takes about half an hour. He got his own set of kitchen knives for his birthday this past year, and they are awesome. I do the peeling and coring, he did the chopping all by himself. The nice thing about apple sauce is that the size of the apples makes no difference,unlike with a pie, so messy chopping is all good! I highly recommend these knives if you have a toddler who wants to help in the kitchen!
Curious Chef Knives via Amazon
We make our favorite apple sauce every year, and it's so simple it's hardly a recipe. We fill a Dutch oven with the peeled chopped apples (I used a full peck of apples), the rind of one lemon (try to keep the peel in one piece so it's easy to remove later), 1 tsp. of cinnamon and a 1/4 tsp. of nutmeg. Squeeze the lemon juice over and bring to a boil over medium high heat. Reduce the heat to low, and simmer, stirring occasionally until apples are softened and break down easily. You can mash it with the back of a spoon or puree with an immersion blender if you wish. This yields about a quart and a pint of applesauce, which goes really fast around here! 

While we make our apple sauce we always talk a little about irreversible change, observe the differences in our apples from start to finish, and review kitchen safety, too. There's a cute episode of Sid the Science kid that uses apple sauce as a science experiment, just in case you have Netflix! 

We also read a few new appley books today, and there are so many out there! I grabbed a few at the library yesterday, and was so happy that they turned out to be great ones! We started with Apple Pie ABC by Allison Murray, which is a quick board book with adorable illustrations and some great new vocab. Jude now knows "ogle," "pine." and "determined!" It follows a little dog through the alphabet while he tries to get a slice of the apple pie his owner has baked and not shared with her little pup.

The next book was Rain Makes Applesauce which I chose by the cover (shame on the teacher in me). It's lovely, just lovely. The illustrations are beautiful, the story is so clever and creative, and Jude loved the silly parts. It's like it came straight from a child's imagination. I'm ordering a copy!

Rain Makes Applesauce via Amazon

The last book is not apple themed, but it's a cookbook and it has a great Apple Charlotte recipe in it! If you love Mary Poppins or quirky stories like I do, the book Mary Poppins in the Kitchen will be a favorite. It's definitely for the older set, but I read the first chapter aloud to Jude today and he loved it. We will likely do a chapter a day and try to bake as many of the recipes as we can. We're going to make the Apple Charlotte for tonight's dessert!
Mary Poppins in the Kitchen via Amazon
What are some of your favorite books to read this time of year? 
Please let me know so I can add them to our book list!

We have yet to do a new apple craft project, but we did a ton of apple stamping last year. We did mini tote bags, lunch bags and pencil cases for party favors, and they are so cute and easy! It's a "hardly any prep" craft, so I'm sure we'll do it again this year! 

Friday, March 13, 2015

Milk Maid

It's all about the boobs once again in the Bean household. 


Nursing Jude was an amazing journey, one that I am still immensely proud of, but one that wasn't always simple. We had our early struggles, but finding Boobie Group was my saving grace. Those 12 ladies are my Jersey fam, and without them I would certainly not be where I am now. Nursing Eden has been smooth sailing so far, so I only popped into a group meeting once for the Valentine's Day party, and then only because my badass doula would be there. That woman is the BOMB. Anywho, I started off on the right foot nursing partly because I never had any supply issues this time around. One of the main reasons is that I knew how much extra water I had to drink, knew what foods to avoid and increase, and also (and best!) because I had Boobie Cookies. My friend Amy makes the. best. lactation cookies, and she brought a dozen over when we brought Eden home. One a day and I was good to go. Little lady is a satisfied babe. However. a cookie a day, no matter how much it supports milk production, is still a cookie a day. Full of butter, sugar, and chocolate, those bad boys weren't going to get me into skinny jeans any quicker.

I needed to find a substitute and fast. I stumbled upon a delicious looking oatmeal muffin recipe from Vintage Kids, Modern World, and got to baking. I wanted to add in the go to ingredients for milk production (brewer's yeast, flax seed, and fenugreek) and take it another step. I added carrots and walnuts for an an extra boost, used honey for sweetness and swapped in coconut oil for a healthier fat (visit Healthful Mama for explanations about this list!). The result is a hearty, healthy muffin that is lightly sweet and super effective for increasing your supply. With no guilt. Promise.


Carrot Cake Oatmeal Boobie Muffins (to promote healthy lactation)
Ingredients:
makes 1 dozen muffins

1 c. rolled oats
1 c. whole wheat flour
4 Tbls. flax seed meal
4 Tbls. Brewers yeast
1 tsp. cinnamon
1/2 tsp. nutmeg
1/2 tsp. kosher salt
1/2 tsp. baking soda
1 tsp. baking powder
1 tsp. vanilla
1/2 c. coconut oil, melted
1 egg
1 c. buttermilk
1 c. shredded carrot (about two medium carrots)
1/2 cup chopped walnuts
1/2 c. golden raisins
1/2 c. dried pineapple, chopped

Preparation:
Whisk flour and oats together in a medium bowl and pour buttermilk over. Refrigerate at least 4 hours, preferably overnight. Preheat oven to 350 degrees and grease or line muffin tin. Add all ingredients except carrot, nuts, and raisins and blend until well combined. Fold in carrots, nuts, and raisins. Divide evenly among muffin tins and bake 12 -15 minutes or until just golden. Cool on a wire rack. Freeze any muffins you will not consume in a day or two!


Friday, February 13, 2015

Cookies for the Kiddos


I used to think Valentine's Day was great. My mom always gave me and my siblings little Russel Stover boxes of candy which we'd squirrel away and nibble for weeks. She'd bake a heart shaped cake and let us stuff our faves. As boyfriend-less teenager I used to host "Lonely Hearts Club" parties at my house for all my single friends. I thought it was really great when I actually had a boyfriend to spend it with, but honestly, Valentine's Day is so much more fun with a toddler. Pretty much everything is so much more fun than a toddler.

Except maybe Whole Foods. I still really like Whole Foods alone. 

Jude thinks all holidays are fun, especially the food. We just had to host a party for his buddies from class. I am all for little treats for kiddos once in a while, but I'm not about to offer up a sugar coma as a party favor to all of the kids who come to our craft classes. Jude really wanted to decorate cookies with his friends, and he was googly eyed over t

he vast selection of candies and sprinkles in the grocery store (he has a thing for sprinkles, just like his mama). To assuage a bit of my guilt about the oncoming candy head rush, I made this healthier version of my favorite rolled sugar cookie recipe. It cuts the sugar, replaces white flour with whole wheat, and the cream cheese keeps it soft and buttery. The dough is really great for detailed cut cookies since it won't spread at all, but we stuck with simple hearts. I kept them small, and whipped up a bowl of cream cheese with a little homemade strawberry syrup for frosting. The bowls of sprinkles, pink candy corn, and conversation hearts were plenty of sugar without using real frosting! Of course, I used a little royal icing for the leftover cookies later, just because I can't resist that glossy look:)

  • Healthier Whole Wheat Sugar Cookies
  • Ingredients:
  • 1 stick unsalted butter, at room temperature
  • 4 oz. cream cheese, at room temperature
  • 1/2 cup raw cane sugar (organic if you can!)
  • 1/2 cup maple sugar
  • 1 teaspoon baking powder
  • 1/2 teaspoon ground nutmeg
  • 1/4 teaspoon baking soda
  • Dash salt
  • 1 tsp. almond extract
  • 1 egg
  • 2-1/2 cups white whole wheat flour flour

  • Preparation:
  • Preheat oven to 375 degrees F. Line baking sheets with parchment paper. In a large mixing bowl, beat butter
    and cream cheese with an electric mixer on medium to high speed until fluffy. Beat in almond extract and egg. Add sugars, baking powder, nutmeg, baking soda, and salt. Beat mixture until combined, scraping side of bowl occasionally.  Beat in as much of the flour as you can with the mixer. Using a wooden spoon, stir in any remaining flour. Divide dough in half, press into discs, and wrap in plastic wrap. Chill for 1 to 2 hours or until dough is easy to handle.
  • On a lightly floured surface, roll half of the dough at a time to a 1/8-inch thickness. Using 3-inch cookie cutters, cut out dough.  Place cookies on prepped cookie sheets and bake for 8-10 minutes or until edges just start to brown. Keep an eye on them as they cook very quickly! Transfer cookies to a wire rack; cool before decorating.

Tuesday, February 03, 2015

Little Love Cakes


I'm getting into the Valentine's spirit a little early this year. Perhaps it's being cooped up in the house thanks to all of this snow, snuggling with my kiddos. Perhaps it's the hormones of a nursing mama with a cutie pie baby girl in her arms most of the day. Or perhaps it's the fact that a FULL MONTH of no sleep (damn you 4 month sleep regression. Damn you straight to hell!) has given me hallucinations that I have had to craft out of my system. Whatever it is, I am all good to go for the love fest. This little cupcake was my first attempt at baking a shape within a cake, and it was a bit of a miss. I need to cut the hearts smaller next time, but they are still cute! The recipe is a modified version of the French Yogurt Cake Jude and I bake together often. It's one of my faves, and the lemon addition makes it fresh and new. It also pairs perfectly with strawberry whipped cream frosting! This is the best little cake to make with your kiddos, since it is forgiving and they can do all the measuring themselves! Remember that a spoon in this recipe equals a teaspoon, and a scoop equals 6 ounces, or one little kid yogurt cup, which we conveniently have lying around often!


Little Lemon Love Cakes with Strawberry Whipped Cream
Ingredients:

Cake: 
3 scoops White whole wheat flour
2 scoops sugar
1 scoop plain, whole milk yogurt
1 scoop vegetable oil
1 spoon salt
3 spoons baking powder
1 spoon lemon extract
2 eggs
zest of one lemon

Frosting:
1 cup heavy cream
4 Tbls. strawberry syrup or jam

Preparation:
Grease a 9x9 round cake pan and preheat the oven to 350 degrees. 

Allow your kiddo to do as much of the scooping and dumping as possible into a large bowl. Mix well with a hand mixer. Pour 1/3 of the batter into a small bowl and tint with beet powder or food coloring. Pour the pink batter into the prepared pan and bake until a toothpick comes out clean, about 15 minutes. Allow to cool completely, then cut hearts using a small cookie cutter (or a knife and a template). Place each heart into a lined muffin tin, pour remaining batter over hearts. Bake until golden, about 12 minutes. 

Beat whipping cream until stiff peaks form, Fold in strawberry syrup. Pipe onto fully cooled cakes.


Tuesday, January 27, 2015

Hello Baby!

Yeah soooo... this is officially the longest blog break I've ever taken. But really? Can you blame me?


4 months old already and this little lady is just too much fun! I will get back to posting all the cooking and crafting (which we've been doing like crazy!), but I'm taking it slow. The boy is doing a bang up job as a big bro, and I'm super proud. We're soaking it all up, so in the meantime, here's a little photo catch-up to tide you over!


Awwww...


Friday, June 27, 2014

So yeah, guess what?


30 weeks seems like long enough to post our official announcement... The Bean family is expecting another little sprout in September! 

To celebrate this big event, I'm hosting a little contest!

Jude immediately gave his baby sister a nickname, one that is sure to stick. If you can guess it, you will be entered to win a full set of personalized plantable note cards! Just type your guess into the comments below and I will announce a winner next Wednesday, July 2nd! You get an extra entry if you like my page and "Share" this post on Facebook, just leave a second comment saying you did so.

Hint: It's a fruity name;) And no fair entering if you already know the answer, friends!

Monday, March 31, 2014

Three

Again this year I am blown away by the fact that my kid had a birthday. Is that going to happen every year? I just don't know how it is possible that we have a three year old, despite the obvious passing of time. Another year closer to pre-K, and school buses, and bike riding and all of those big boy things that will future cement the fact that our Bean is not even close to being a baby. It should be obvious since he is huge and talks like he's twelve, but it's like I'm the last person to figure it out.

This year's birthday celebration was art themed, since we spend a good chunk of our time getting crafty, and he loves it! I also figured that since most of Jude's buddies have come to our craft workshops at least once, it would be an easy way to corral them all into something organized and almost noise/motion less for at least ten minutes. With 30 people in the house and gloomy weather all day, that was a necessity.

We did a little bit of prep every day the week before the party and Jude helped with a lot of it. That way it kept him happy and busy during the day and kept me from getting overwhelmed by last minute stuff! One nice thing about his being a big boy is that he is actually incredibly helpful! So now you can get ready for the barrage of party photos and details... or just skip it:)


We spent an afternoon splatter painting with watercolors, and the big sheets became the base for the invitations. They are based on the idea of a gallery opening notice, so I kept the texts and design very simple. I wanted it to be bold, but didn't want to obscure the spatter paints. We stuck with primary colors so that became the color scheme for everything else! If you'd like to order invites, please visit the shop!


I covered all of the kitchen art with art of our own to make a little family gallery wall. The hearts and truck drawing (yes, those are trucks spraying out a fire!) are Jude's, the peach is mine, and the scene in the window is E's. He's actually very artisitic (just don't tell him I told you).


Kitchen decor was really simple, just primary colored streamers and balloons, a paint brush banner wrapped around the light fixture, and inexpensive table cloths. I spread some kraft paper on the table for people to draw on, and the paint dripped mason jars were another kid craft project. Again, if you'd like to order a banner, you can visit the shop!


Food is obviously the most important part of any party, and we stuck with brunch items since it was early! Bagels and different spreads, a big fruit salad, danish in primary colors, mini strata cups (which were in the oven at the time I took this photo), "creative juices," a paint dripped cake, and parfait push pops.


The cake was a version of my mom's lemon layer cake, but only one layer was lemon. I added a layer of cherry filling and a layer of blueberry filling to follow the primary color theme.


It was gooood. This is all that's left, so I may be having it with coffee later!


I didn't have a lot of decorating to do in the craft room, either, since it is basically decorated all the time with giant tissue pom poms and banners, plus our big art display board. I hung some balloons and drew up a little faux gallery wall background on kraft paper during a "Call the Midwives" marathon one afternoon, and that was it.


The kids worked on monogram canvases, which was super fun, and they came out so cute! I used green painters tape to make it easier to pull off, and it was kind of a PIA honestly. Most of Jude's buddies have curvy initials, so cutting and lining up all of the pieces of tape for 13 canvases took me forever. It was the most time consuming thing of the whole party! In the end it was worth it, since it kept them busy and they all had a ready to hang work of art to take home in the end!


We spent another afternoon making playdough favors, which Jude loves. We used my favorite playdough recipe (which I will post later since I have a few tips to add to the original!) and colored it red, yellow, and blue. I added a little color blending chart (similar to the ones that are on the parfait stand) and stamped tags from the scrap paper leftover from cutting the invitations.


Don't know why I don't have a clear shot of these, so use your imagination!


I stenciled a shirt for Jude to wear with a Basquiat crown, since he's one of my favorite artists, and this is the only photo I have of it somehow! It's probably just as appropriate for my child to wear Basquiat as it is for him to wear his Old Dirty Bastard shirt, so I'm cool with it. Only one of the parents knew what is was anyway, so we didn't have to delve into how fitting it is to use my toddler to pay homage to one of the 27 club members.


And the obligatory blowing-out-the-candle shot. He didn't even spit on the cake! 
But he didn't eat it either. He still prefers bagels.

*If you like this post, please take a moment to head over to the party post on Project Junior
and show a little comment love or 
click the stars to add your rating! 

Wednesday, March 05, 2014

M's Honey Bear Baby Shower


We could start a rugby team with all of the new babies that have been born to our crew over the last few months. It's been a bonafide baby boom, and there appears to be no end in sight. My sister M will be the next mama to join the crew, welcoming her first bambino in just  a few weeks time. To celebrate, we had to throw her a baby shower fit for our cuddly baby bear to be, and it was a little too much fun. 

Typical of my craft addicted ways, I went slightly overboard making fun paper goods, but in the end it all looked so adorable that it was worth the last minutes of inky fingered mania. 

My mother made a gorgeous set of crib bedding for M in vintage teddy bear prints, and that became the inspiration for the party theme. Since Baby's gender is still a surprise, honey yellows and browns were a perfect neutral color scheme. I used as many personal touches as possible (that's Jude's favorite teddy in the center), and really wanted everything to be reusable  in the nursery (I think you all know how this girl hates to throw anything away).


The invitations, printed on plantable seed paper in lemon yellow and available here.

The favors were small jars of local honey made by my pal Leeann. They were a huge hit, wrapped in tulle and tied with plantable seed tags. You can find the honey bears in Lee's Etsy shop, and the tags in mine!


Each table was decorated with pint sized mason jars wrapped in kraft paper and tied with yellow striped bakers twine. Place settings were set with these fun game cards. Each had a Baby Shower Bingo game on one side and a Celebrity Baby Name Matching Game on the other. 


The gift table was adorned with paper pinwheels and little honey and bear themed baby onesies on a line. They were a last minute addition, so the onesies are just iron on images of designs used for other pieces of the decor! Hopefully they hold up through the many washing of a newborn babe! On the top of the table we set another of Jude's teddy bears with a large mason jar. The sign says "What will it bee?" and guests were asked to place their votes for Baby's gender. The majority vote was a boy, but I'm still holding on to hopes for a little lady!


No family party is complete without my mother's maids of honor, a recipe handed down from my great grandmother. They are my favorite thing on earth, and the inspiration for the Peanut Butter and Jelly Cupcakes I posted from E's birthday. Sadly, they had a bit of a mishap on the way to the party, and all of the cute coconut grass meant to be set beneath them on the stand ended up on top. My mom was a little bummed, but they still looked so cute! I made tiny paper flags for them and I still can't get over the perfect little bear candies she stuck on top. She found them at WalMart of all places.


And an obligatory 'smiley preggo opening presents' shot. 
Because no one is cuter than a pregnant girl, at least not until the baby is born.


Tuesday, March 04, 2014

New twists


I am going through a serious food boredom phase. Blergh. After I started the Bon Appetit Food Lover's Cleanse in January, I had a solid two weeks of being excited about everything I was cooking, followed by a quick plunge into carbaholic overload. This girl just can't get by without the occasional bagel with cream cheese, so a week of withstanding the temptations ended up leading me down the slippery slope into binge town. It has lasted about two months. Yup. That isn't to say I have eaten nothing but junk for two months, but I haven't been all that diligent. E is also training for the NY half marathon. His Sunday afternoons are taken up by 14 mile training runs, which means Sunday evening visits to our favorite pizza joint where we inhale penne ala vodka, grandma's pies, and garlic knots like our lives depend upon it. I do always order a salad, so there's that.

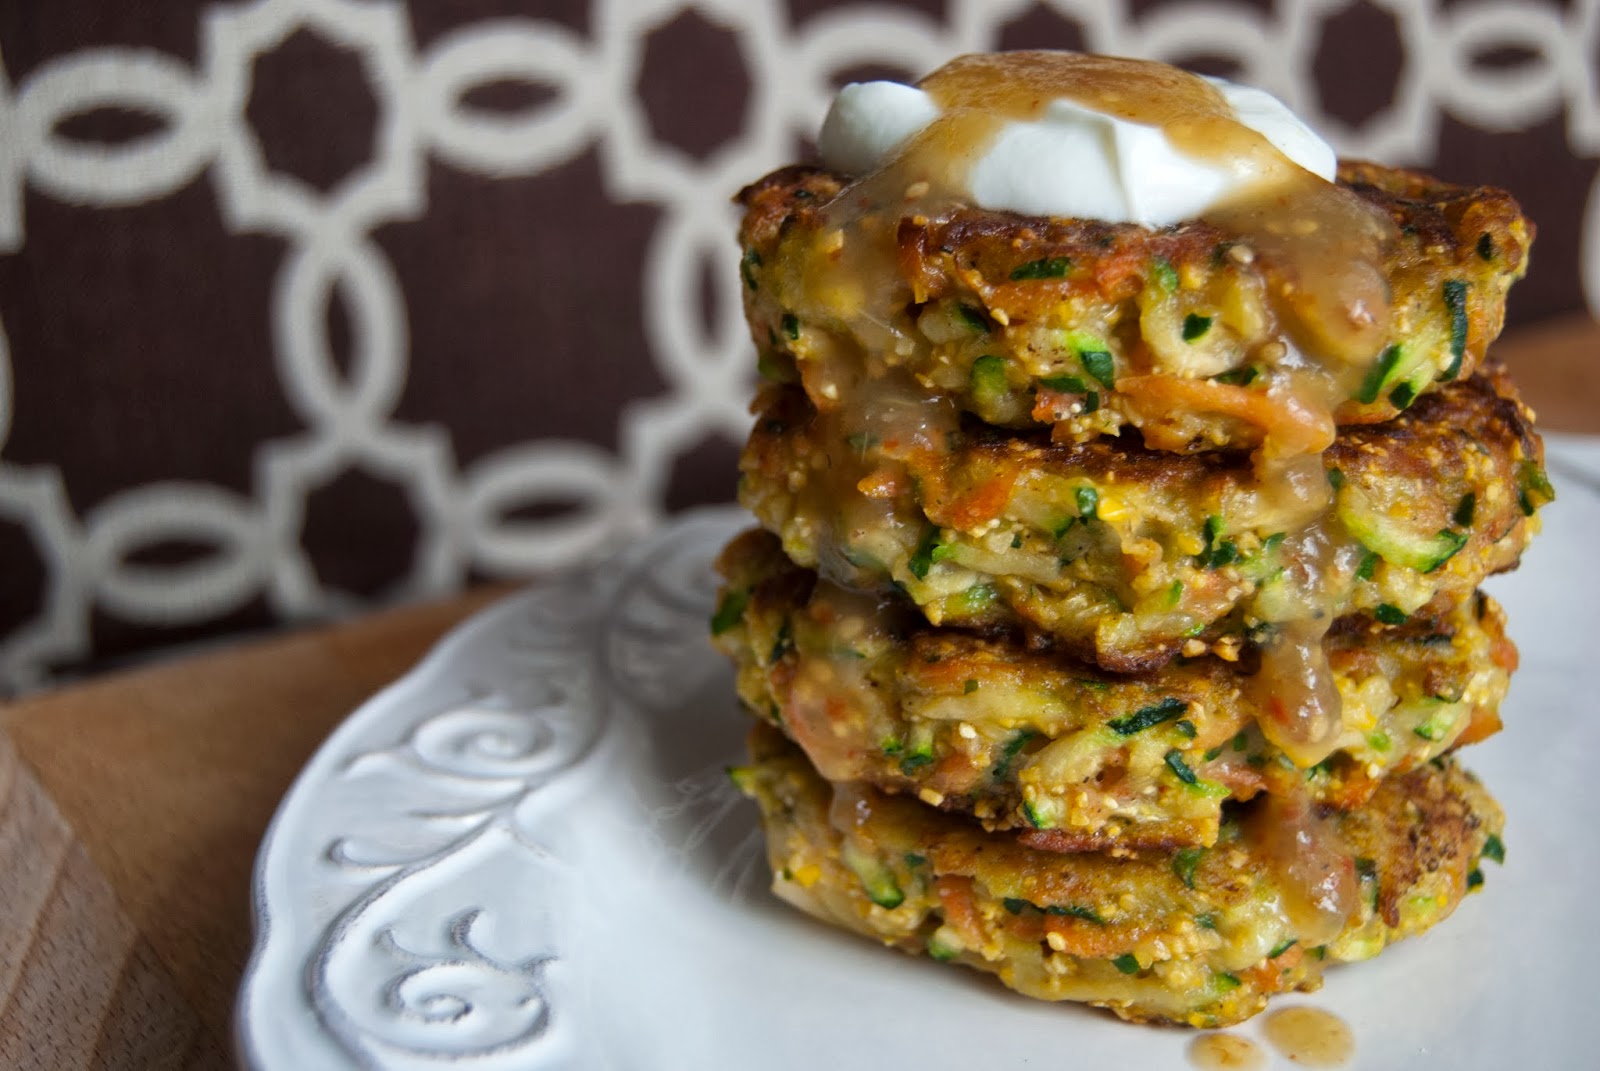
This ridiculously cold weather, constant snow, and desire to do nothing but cuddle on the couch with my kiddo doesn't help. It has all led to my feeling a bit blah, so I did a big fridge clean out, got back to my meal planning and borrowed some new workout DVD's from the library. Time to regroup. I'm kick-starting some new food fun with a couple of new recipes, including these fritters. I have seen all kinds of Paleo zucchini fritters floating around, but I'm just not ready to jump on board that Paleo train just yet (note the aforementioned carb addiction). They also all seemed to be lacking a bit in the flavor department, so I did some adjusting and ended up with a really delicious veggie packed fritter that you could serve as a main dish or a side. You can also make them smaller for little fingers and use them as a kid friendly snack. Love.


Carrot and Zucchini Fritters
Ingredients:
3-4 zucchini, to make 3 cups shredded
1 large carrot
1 small shallot
1 egg, beaten
1/4 cup flour
1/4 cup cornmeal
1 tsp. freshly ground black pepper
1 tsp. salt
1/2 tsp. cayenne
1/2 tsp. garlic powder
4 Tbls. butter

Preparation:
Using a food processor with a shredder blade (or a box grater), shred zucchini and place in a large bowl. Sprinkle with salt, toss to combine and set aside for a few minutes. Shred carrot and shallot and place in a separate bowl. Using your hands, squeeze all excess liquid from the shredded zucchini. There will be lots! Keep squeezing by handfuls even if you think you are finished! Add to the bowl with the carrot and shallot. Add flour, cornmeal, seasonings and egg and toss to combine.

In a large skillet, melt 2 Tbls of butter over medium high heat. Using a large batter scoop (about a 1/4 cup) scoop up the veggie mixture and press gently into the scoop to mold. Flip the scoop out into the hot pan and press lightly with your fingers to flatten. Don't crowd the pan, start with 4 or 5 fritters. Cook on one side until crisp and well browned, about 4-6 minutes. Flip and continue cooking until the other side is crisp and browned. Remove to a paper towel lined plate. Melt the remaining butter before adding more fritters to the pan. Serve hot with a dollop of plain yogurt and some hot sauce. That's habanero green enchilada sauce in the photo, to which I am currently addicted. That recipe can be found here!


Linked to Healthy Roots, Happy Soul, Premeditated Leftovers

Thursday, August 22, 2013

Lucky duck

I'm pretty lucky.

I tell myself this often.

Most often on the days when my normally wonderful toddler decides to do a fully normal toddler behavior, like slither into the bottom of a police-car-shaped shopping cart and lick the possibly-E.coli-covered steering wheel that is sticky with week old who-knows-what. Moments after he intentionally dumped a cup of water on his shirt, shorts, shoes, and the floor of the market. All while singing loudly about how "luck" rhymes with "duck" and "cluck" and "tuck" and, you guessed it, "fuck", and smiling at old ladies. Yup, I'm lucky.

I have a healthy, happy, active little boy who keeps me on my toes every day, and it's awesome. The trials are minor for the most part, and a healthy dose of added patience mixed with a touch of creativity goes far to keep me from forgetting how great we have it. Being grateful is something I wasn't always good at, but having a kid put that into perspective for me. I have nothing to complain about.

Don't worry, there is a recipe coming :)

In a moment of creative problem solving, we took a visit to the library. We checked out the book Oliver's Fruit Salad and now Jude is obsessed with making big bowls of fruit
salad. This is nice, since for months the only fresh fruits that he ate consistently were apples and bananas. I was forever buying pineapples, berries, or melons when he asked for them at the market, only to have him ask for something else once we were sitting down to eat. I started getting irritated, bothered by throwing away spoiled fruit, stressing about wasting a few dollars, worrying about the lack of vitamin C in his diet.

And then I realized I was being stupid.

Almost every time I feel overly stressed or worried about something with Jude, it's because I am being stupid.

I take a deep breath, remind myself that he is fine, and I am lucky. Then we have a big bowl of fruit salad with a little of this incredible fruit sauce on the side, because nothing makes my kid happier than dip. We whipped up a batch of this to bring to dinner with friends, after I realized every recipe for fruit dip on Pinterest had cream cheese and marshmallow fluff in it. This is better for you, yummier, and prettier, and your little can help. Jude especially likes squeezing lemons, since I tell him he has to do it with his eyes closed. He gets it everywhere, but he also gets super excited. "I am SO LUCKY to have a lemon!"

Banana Cream Fruit Sauce

Ingredients:
8 oz. cream cheese, at room temperature
1/2 c. sour cream
1 frozen banana
zest of one lemon
1 Tbls lemon juice
1 tsp. vanilla extract
4 Tbls. powdered sugar
1/4 c. vanilla soy milk

Preparation:
Add all ingredients, except soy milk, to your food processor bowl or blender. Pulse just to combine. Your mixture should be thick and may be a bit chunky at this point. While processing on low, add milk in a thin stream until sauce has reached a smooth, pourable consistency. Serve drizzled over fresh fruit or cake, or as a dip.

Wednesday, July 24, 2013

The Bean's First Cake


Move over, Christina Tosi, there's a new baker in town!

It'll be a few year before we know if the Boy is really into baking, but his first attempt went pretty well! I have been wanting to give him a more hands on baking experience, and the rainy, gray weather earlier this week was perfect timing. Sadly, every recipe I found for a "dump cake" as they are often unappealingly dubbed, required canned fruit fillings, pudding mixes, or boxes of cake powder. Not quite what I had in mind.

Leave it to the French to have exactly what I was looking for. French yogurt cakes are very popular, and kids there learn to make them very young. Now I'm only half French,as is E, so that makes the Bean half French, too. Maybe he channeled a bit of his French roots while we put this cake together, because he really didn't need much help. He also, in a stunning turn of events, didn't even make a mess. That bit of spilled flour on the floor by his bowl? That was it. He's keeps a cleaner kitchen than I do.

I adapted a recipe from Montessori Works and got to work. I intended to spread a plastic tablecloth on the floor, fully prepared for the upcoming flour and sugar hoo-rah, but I decided to skip it last minute. Half the fun is the mess, right? I set out all of the ingredients, a wooden spoon, large bowl, scoop and spoon. Our "scoop" was a small yogurt cup, which measures approximately 6 oz. and our "spoon" was a measuring teaspoon. The recipe is very forgiving, unlike most cakes, so if your little goes over or under on the measuring, it won't make a huge difference! I cracked the eggs and poured the oil into the scoop while he held it, but Jude did the rest! He even mixed it pretty well with a big wooden spoon, but I did scrape the bowl into the pan and put the cake into the oven while he hung onto the freezer door handle (that's his 'spot' when the oven is open). He kept running into the kitchen to watch the cake through the glass, and yelling, "It's readyyyy!"

His favorite part was drizzling the icing over the cake once it cooled, and he couldn't wait to tell E about it when he came home. He even had to call my mother to tell her about it this morning. He wanted to make another. Maybe I do have a kid with a sweet tooth after all.

French Yogurt Cake 

Ingredients:
3 scoops whole wheat flour
2 scoops sugar
1 scoop plain, whole milk yogurt
1 scoop vegetable oil
1 spoon salt
3 spoons baking powder
1 spoon vanilla extract
2 eggs

For icing:
1 scoop powdered sugar
1/2 spoon almond extract
2-3 spoons water

Preparation:
Grease a 9 inch round cake pan and preheat the oven to 350 degrees. Allow your kiddo to do as much of the scooping and dumping as possible into a large bowl. Mix well with a wooden spoon and pour into the pan.

Bake for 35 minutes or until a tester inserted in the center comes out clean.

With a whisk, mix sugar, almond extract and water to make the icing and drizzle over cooled cake.