Thursday, February 27, 2014

Happy Birthday, E!


Yesterday E turned another year older. Birthdays are kind of a big deal around here, but even more so since we had Jude. Having a kid has given me a new excuse to be ridiculous with any celebration that pops up, it just gets harder to top myself every year. This year Jude and I drew a giant birthday card for his annual "Happy Birthday, Daddy" Facebook photo, and as cute as it is, it still can't beat the original.


Anyhow, along with crating and photo taking antics, we had dinner at E's favorite Mexican place, followed by birthday cupcakes and candles. The perfect birthday cupcakes for someone who isn't into chocolate? PB and J of course. Nothing could stop me from whipping up a little bit of fudge frosting for the extra cakes, though. Because despite E's aversion, it isn't a birthday in my kitchen if there isn't some chocolate floating around.

These cupcakes began as a spin on an old family favorite, the maid of honor. They are a little pastry that my great grandmother made, then my grandmother, and now my mother is in charge. They have a pie crust base and a lightly sweet vanilla cake on top, with raspberry filling and almond frosting. No family event is complete without them. And though there are many versions of peanut butter and jelly cupcakes out there, most of them are missing the essential crust. This version has the lightly toasted crust, fluffy white bread-esque cake, a jam center and the fluffiest peanut butter frosting known to man.

Peanut Butter and Jelly Cupcakes
makes 18-20 cupcakes

Ingredients:
Filling:
1 cup strawberry, blueberry, or grape preserves
Crust:
1 1/2 sticks unsalted butter, cold and cut into cubes
3 c. all purpose flour
1 tsp. salt
1 Tbls. sugar
1/3 c. very cold shortening
1/2 c. cold water
Cake:
1 1/2 c. all purpose flour
1 tsp. baking powder
1 tsp. salt
1 c. sugar
1 stick unsalted butter, softened
3 large eggs, at room temperature
1 tsp. vanilla extract
3/4 c. buttermilk
Frosting:
1 c. peanut butter
6 Tbls. unsalted butter at room temperature
Pinch of salt
1 tsp. vanilla extract
1 c. confectioners sugar
1/2 c. cream

Preparation:
Grease muffin tins with butter and dust with flour.

Prepare crust. In the bowl of a food processor, pulse flour, salt, and sugar until combined. Add cold butter and pulse a few times until the butter resembles small peas. With the processor turned on, add the cold water a Tbls. at a time, until the dough forms a ball. Dump the dough onto a sheet of plastic wrap and knead into a ball. Wrap tightly in the wrap and refrigerate 30 minutes. Once chilled, slice dough ball in half and return one half to the refrigerator. On a floured board, roll the other half into a 1/4 inch thickness. Cut rounds using a biscuit cutter and press into prepared muffin tins. Repeat with the remaining dough.

In a small bowl, stir the jam until smooth. Spoon a generous teaspoon into the center of each muffin cup. Set aside.

Preheat oven to 350 degrees. In a medium bowl, sift together flour, baking powder, and salt.
In a large bowl, cream butter and sugar using a mixer. Add eggs and vanilla and beat until light and fluffy. Add flour mixture and milk gradually, alternating between additions and scraping down the sides of the bowl.
Pour batter into muffin cups, leaving 1/4 inch space from the top. This should be just enough to cover the jam.

Bake for 18-20 minutes, or until cakes are just golden. Allow to cool 5 minutes in the pans before inverting onto a wire rack to cool completely.

Prepare the frosting. Beat butter and peanut butter at medium speed until combined. Add vanilla, salt and sugar and beat until fluffy. Add cream and continue beating until pale and fluffy. Frost each cupcake and top with sprinkles if desired.

Friday, February 21, 2014

Triple Ginger


I think it is pretty safe to say that I am cookie obsessed. It's not a bad thing. Cookies cure everything from heartbreak to homesickness, boredom to the blues. My usual go-to mood booster cookie is chocolate chip, but when I want to mix it up a little I go for ginger. I absolutely love these Triple Ginger Cookies from Bon Appetit for their spice and snap. However, they are a little heavy on the molasses and I was looking for something a bit softer. See, E doesn't really do chocolate, and after our anniversary dinner at Le Bernardin, he is obsessed with mango gelato. For Valentine'd Day I had to make that gelato for dessert, but I couldn't serve it alone. It was served with little bits of crystallized ginger at the restaurant, so that was what inspired my hunt for a perfect ginger cookie. This one did it. Super soft on the inside, a little crisp on the outside, buttery and super gingery. The best part is that when kept in an airtight container, they were exactly as soft even a week later. No need to give them all away or scarf down 8 cookies in one sitting so they don't go to waste! You can dole them out as needed for a mood boost, and they are especially good on a gray, rainy day like this with a mug of hot tea.

Soft Baked Triple Ginger Cookies
from Theresa Sullivan
Ingredients:
3 tablespoons milk
1 tablespoon fresh grated ginger
2 1/4 cups all-purpose flour
1/2 teaspoon baking soda
1 teaspoon baking powder
1/2 teaspoon table salt
1 teaspoon ground ginger
1 1/2 cups sugar, plus 1/3 cup for rolling
2 ounces cream cheese, room temperature and cut into small pieces
6 tablespoons unsalted butter, melted and still warm
1/3 cup vegetable oil
1 large egg
1 teaspoon vanilla extract
1/2 cup chopped candied ginger

Preparation:
Preheat oven to 350°F. Line two baking sheets with parchment paper.
Combine milk & ginger in a small cup. Heat in microwave for about 20 seconds. Set aside to steep.
In a medium bowl, whisk together flour, baking soda, baking powder, salt and ginger. Set aside.
In a large bowl, blend together sugar and cream cheese. Blend in warm melted butter. Add oil, egg, milk steeped with ginger, and vanilla extract. Blend until combined. Fold in flour mixture with rubber spatula until incorporated and a soft dough forms. Fold in chopped candied ginger. Refrigerate dough for 30 minutes until it firms enough to roll into balls.
Place remaining 1/3 cup sugar in a small bowl. Using a 1 1/2 Tablespoon cookie scoop, portion out 12 dough balls per baking sheet. Roll each dough ball in your hands, then roll in sugar to coat. Space about 2 inches apart on the baking sheet.
Bake 1 sheet at time at 350°F for 11-13 minutes, until set and just beginning to brown on the bottom. (They might not look done, but don’t over bake!) Cool on the baking sheet for 3-5 minutes, then transfer to a wire rack to cool completely. Store in an airtight container at room temperature.

Thursday, February 20, 2014

The Little Bean Toddler Arts and Crafts Workshop - Winter Round-up

Back in the fall, I started running a little arts and crafts workshop for toddlers in our home day care. I knew the boy and I would start getting pretty antsy come winter, and although he has an awesome group of buddies, I wanted him to start interacting with some new people. Looking around at commitments and prices for the kiddie programs in the area left me feeling pretty bummed. $15 for an hour of open gym time? Or $35 for an art class once a week? I just couldn't justify it, especially since I knew we could plan something fun for ourselves with just a little time and money. 
I asked around, then made up a schedule and posted it to my Facebook page. Over the past few months our group has grown to include 18 mamas and their toddlers who pop in for classes. It's been so much fun, and my favorite part is watching all of them get to know each other. 

I try to use our favorite books as inspiration for our projects, so I thought I would share some of the things we have worked on so far this winter. We have had record breaking snowfall this year, so with all of the snow days, everyone is feeling a bit like caged animals. If you and your littles fall into that category as well, these are some fun activities for you to try out the next time you find yourselves deliriously house-bound.


The Snowy Day

One of my favorite winter themed picture books is The Snowy Day by Ezra Jack Keats. It's a classic, and it perfectly captures the fun and exploration of a small boy out playing with snow. The colors are bold and bright, and the story is a great length for toddlers from one year on up. 

Peter watches his footprints in the snow, makes tracks with a stick, watches some older boys have a snow ball fight, and  tries to keep one in his pocket. I figured a perfect project would be to make some of our own white playdough and set out different tools for the kids to explore with their "snow." They had a great time making little snow men and rolling out the dough and drawing tracks or stamping objects into it.

Ingredients for Perfect, Long Lasting Playdough:
1 cup water
1 cup all purpose flour
1 Tbls. vegetable oil
1/2 cup salt
1 Tbls cream of tartar

Instructions
In a pot over medium heat, stir water, oil, salt, and cream of tartat until warmed through. Remove from heat and stir in flour util combined. Turn out the mixture onto a board or countertop and knead until smooth. Store in an airtight container or ziploc bag for up to six months! If you find your dough dries out at all, try adding a teaspoon of water and kneading it again until it is soft.

Tools for creative play:
- a paper plate
- a ball of dough
- a small rolling pin (actually they are cylindrical wooden blocks!)
- a pine cone
- a craft stick
- small cookie cutters

Ice

Another incredible winter picture book is Ice by Arthur Geisert. It isn't a great read aloud book, because, guess what? It has no words. It's pictures tell the story of Geisert's familiar crew of pigs on a new adventure. They find an iceberg, and have to figure out how to carve it up and transport it. They make all kinds of crazy machines, and your little one could probably look through this book for an hour discovering all of the little details. We couldn't exactly carve ice with a bunch of 2 year olds, but I figured some ice painting would certainly be manageable!

Tools for creative play:
- An ice cube tray
- water
- food coloring
- craft sticks
- water color paper

Fill your ice cube tray with water and add drops of food coloring to each one. Obviously the more food coloring you add, the bolder your colors will be. Snip craft sticks in half and put one into each space in the tray. These will serve as handles. Let paint cubes freeze overnight.

I set out a sheet of watercolor paper for each kiddo on top of a big plastic table cloth and let them go at it. This is a fun activity for talking about hot versus cold, melting and freezing, and color blending. The kids made a huge mess, and created some very cool effects with their paints!

Snuggle Puppy

OK, so this one was a Valentine's Day themed story and project, but it doesn't have to be! Snuggle Puppy by Sandra Boynton is one of the first board books I ever read to Jude, and one I buy for every friend who has a new baby. There is also an adorable audio version of the story, sung by Eric Stoltz, that we like to listen to along with the book. Since it's February, we did love themed crafts to imitate the imagery and bold colors of this sweet little book. 

Bleeding art tissue paper is one of my favorite kiddie craft supplies. Unlike regular tissue paper, it is heavily pigmented and meant to get wet, so that the colors will bleed onto paper. We have done several projects with this paper and this time we paired it with pastels to create a resist.

Tools for creative play:
- Bleeding art tissue paper
- Heavy cardstock or watercolor paper
- Pastels or crayons

First we let the littles scribble a design on their watercolor paper (or the mamas drew something). It is important to use a heavy hand with the pastels or crayons here, because you want it to resist the water later! Then they spread pieces of bleeding tissue over the designs. It can help to use a bit of glue from a glue stick (nothing permanent!)  to keep the tissue bits in place, especially with a group of energetic kids! Once the image is covered, they used paintbrushes, cotton balls, and cotton swabs to bruch water over the surface of the tissue. Once dried, the tissue falls away leaving a watercolor effect behind, and the crayon image shows through.

Next up is one of our other favorite books, Perfect Square by Michael Hall, a collage art book that is so simple, but a fantastic invitation to create collage art in a small space. Class is tomorrow, so I will post some photos and share the steps for that project soon!

Do you have a favorite picture book that inspires you to create with your toddler? If so, please share it in the comments so I can look into it!


Friday, February 14, 2014

Happy Valentine's Day!


Oh hooray! It's here! The day that is the most equally loved and loathed holiday of the year! Well, whichever category you happen to fall into, you can't deny the ridiculously over-zealous holiday spirit that explodes across the internet over Valentine's Day. I recently discovered the vigor with which elementary school moms also debate the pros and cons of this day, thanks to my little town's Facebook page. The fury that candy isn't allowed in class was so hot I was laughing at each post (oh, and the turn the conversation took. Allergies, diabetes, obesity, oh my!). Then came  claims that kids were home crying because Valentine's Day parties would be postponed due to school closings. The horror! Might I share with you why or schools have closed two days this week? Take a gander:


That's our deck, people. I couldn't get out there if I tried. Roads are a disaster, schools and businesses are closed, and children across the county are wailing with sobs that their 4th grade party is postponed. Sigh. It's seriously time to get a grip people. 

While I love Valentine's Day (another excuse to snuggle my family, make treats, and send cards? It's right up my alley.), I certainly don't love the pushy, in-your-face bullshit of it. So, we'll be celebrating sans bullshit over here. We had a nice family breakfast (after E spent two hours digging our cars out) with heart shaped toads in a hole, fruit, and bacon. Jude hung out with a buddy this morning decorating cookies, and then we made mango ice cream for later. E doesn't really do chocolate, so we are having mango ice cream sandwiched between soft baked ginger sugar cookies tonight. They are DOPE, so I'll post that recipe tomorrow! Dinner will be Ina's Beef Bourguinon with garlic mashed potatoes. Simple, hearty winter food that's a bit special sine I never make it. We don't usually do gifts, but I did buy Jude a little something because I couldn't resist. 


Could you? I mean really. If you haven't seen the shop Her Bunnies Three and you have a little one, please do go over and visit! Her dolls are so adorable and she held a flash sale over the weekend. I scored a little blonde Mini Sweetie for Jude, which will be here any day. It will be his belated valentine, so he'll just get lots of extra kisses in the meantime.

So, how do you celebrate this so-called Hallmark holiday? Dinner out and roses? Scorn and Morrisey on repeat? Either way, I'd love to hear! I'm always gathering up ideas for next year!

Monday, February 03, 2014

Leftovers Shmeftovers

Well, that Super Bowl was a bust! Boring game, boring commercials, a total snore fest (unless you are a Seattle fan, I suppose!). Thank God for Bruno Mars or I would have fallen asleep on the couch in a carbo-cheese induced coma. The Super Bowl almost always ends up turning into a mini-Thanksgiving food wise, with a bunch of people stuffing their faces with everything in sight, then passing out on the couch full of beer and shame. Then come the leftovers. At least with Thanksgiving you can easily make another meal of it, but Super Bowl leftovers require a bit more creativity. Is your fridge stuffed to the gills with bowls of leftover guacamole, spinach dip, salsa, buffalo wings, or cold cuts? Not to worry. These ideas will get it gone for you, and fast.

What to do with all the leftovers?

1. Calzones. Just preheat your oven to 400 degrees and roll a prepared pizza dough into an oval onto a greased cookie sheet. Spoon the dip onto one side of the oval, leaving an inch border at the edge. Top with a little extra shredded cheese if you like and fold the dough over the filling. Pinch the edges to seal and bake for 30 minutes or until the crust is browned. Serve with some marinara for dipping! This is also a great way to use up your leftover pizza dip, buffalo chicken dip, or wings.

2. Macaroni and Cheese. Boil 8 oz. of whole wheat shells, reserving about 1/4 cup of pasta water. Melt 2 Tbls. butter in a sauce pan with 2 Tbls. of flour, whisking constantly until it is golden. Whisk in 1/2 c. milk. Then add a generous cup of spinach dip, stirring until smooth. Toss pasta, reserved cooking water and the sauce together and serve immediately. Again, you can substitute the spinach dip for pizza dip, buffalo chicken dip, or wings.

3. Pizza. This one works for just about any leftover appetizer you can think of. Roll out a prepared pizza dough and cover it with anything! Those dips or wings I keep talking about, crumbled meatballs, sliced ham or capicola from your deli tray, whatever! Just top it all with some shredded cheese and you are good to go!

4. Quiche, Omelettes and Frittatas. Eggs are my favorite way to use up leftover salsa and cheese, as well as any raw veggies from a veggie tray. Saute those bad boys up with a little oil, and pour a few scrambled eggs on top. Sprinkle it with cheese, fold it over and serve with salsa (or maybe a little guac if you're feeling crazy.) To make a quiche, spread 1 cup of your leftover dips (buffalo chicken, spinach artichoke, pizza, etc) into the bottom of a prepared nine inch pie crust. Whisk together 4 eggs and 1 cup milk or cream and pour over. Then bake at 350 degrees for 35-40 minutes until the eggs are set and golden brown.

5. Sandwiches (but only if you didn't actually make sandwiches for the Superbowl). All of your dips make great sandwich spreads, as long as you pair them with the right ingredients. Sliced turkey with artichoke dip? Yes please. Pizza dip on ham? Not so much. Any leftover chicken makes great chicken salad, obviously, and guacamole is fantastic in quesadillas or wraps.

6. Salads. I know, you really need a salad after that binge-fest last night. All of your cold cuts, chicken, cheese, or steak leftovers make perfect toppers for a big ole' healthy bed of greens. Use leftover ground beef with your guacamole and salsa to make a taco salad, or shred the wings and add cranberries and raw veggies from your veggie tray. However you mix it up, you're guaranteed to feel a little lighter.

7. Smoothies or Parfaits. Just in case you actually had some fruit at your party (which we actually did, so there!), you may need ideas for using it up before it spoils! This is my Pinterest board dedicated to drink recipes. Click on over and go nuts making a different smoothie every morning until the fruit is gone! Or layer your fruit with yogurt and granola and call it a healthy breakfast or dessert. Anything to erase the bloat from yesterday.

8. Pancakes. You're all confused now, probably because you're thinking of spinach dip, which I do not suggest putting into pancakes. Fruit obviously works in pancakes, and guess what? So do hot-dogs.Really, I haven't lost my mind. Bear with me as I toss an old school WT breakfast food at you. Slice the dogs up into 1/4 inch rounds and toss them in a bit of maple syrup. Prepare your pancake batter, pour into a hot pan, and drop the sliced dogs into them, as a normal person would blueberries. Flip and serve with butter and syrup. It may be a breakfast at the same caliber as Velveeta and shells, but hey, would you rather throw them away?


Thursday, January 02, 2014

One Last Hoorah

I don't make New Year's Resolutions. I like deadlines and lists and inspiration boards as much as the next gal, but I just can't see the point of making promises I can't keep. "This year I'll join a gym and work out three days a week!" Um... no, I won't. Instead of resolutions I have a running list of goals that are perpetual, and I add and adjust when I need to. I have personal goals, business goals, goals for my relationship and my kiddo, but none of them start January first. (Thankfully, because it's the 2nd, so I would have failed already.)

What I am starting right now is a modified version of the Bon Appetit Food Lovers' Cleanse, a way to kick up some inspiration in my kitchen and up my energy all at once. After the holidays I tend to drag my ass around the house, grazing on leftover gingerbread and refusing to put away decorations because I feel too lazy and would rather nap. Not this year. I scrubbed the stove and fridge this morning and dumped all of the gross shit I found in there (Yellow mustard from Kroger? That was three moves ago.). Then I printed off my shopping list and hit the market. There are a lot of complaints about the expense of this list on BA's Facebook page, but let's get real. If you have a well stocked pantry and a bit of brains, you can make this work. I did all of my shopping for week one and spent $98. That's less than I usually spend on a week's worth of food, y'all. I had most of the pantry items already (see all that stuff I crossed out?), did a bit of swapping on ingredients, and I'm good to go.

However, I have one last ridiculously indulgent thing to share with you all before I go all quinoa, kale, and hemp seeds on you. Remember that cooking demo I did in November? I promised to share the amazing pumpkin lasagna made by Sara that night, and I finally got around to taking photos of it. I made this dish three times in a month. I made a double batch at the end of November (one as a test and one to bring for Thanksgiving with friends) and it was such a big hit that I made it again for Christmas with my family. It is perfect for a gathering, but just as wonderful on a day like this, when a massive snow storm looms and you need to hunker down. If you've started a new diet today, save this recipe for your next shindig, because I don't want anyone ruining their New Year's Resolutions on day two. Although if you did ruin a resolution with this lasagna... it would be totally worth it.

Pumpkin Lasagna
from the kitchen of Sara Van Goor

Ingredients:
1 box (1 1/4 lb) of lasagna noodles (I use no-bake noodles, Sara does not, so it is up to you!)
8 oz. thinly sliced prosciutto cut into 1" x 1" pieces
1/4 c. sage leaves torn into irregular pieces
1 1/2 c. of freshly grated parmesan
2 c. chopped walnuts lightly toasted

Pumpkin Filling:
1 stick of butter
6 leeks, trimmed, rinsed well and minced
4 c of pumpkin puree (1 large can)
1/2 cup dry white wine
salt and pepper to taste

Bechamel Sauce:
1 stick of unsalted butter
6 Tbsp of flour
2 cups of chicken broth (room temp)
2 cups of light cream (room temp)
1 cup of freshly grated parmesan cheese
1/2 teaspoon of nutmeg
salt and white pepper to taste
3 large eggs, at room temp, lightly beaten

Preparation:
Preheat the oven to 350 degrees and butter a 9 x 13 inch casserole or baking dish.
If using regular noodles, boil and drain.
Prepare the pumpkin filling: Melt the butter in a large skillet, add the leeks and cook until tender, about 15 minutes. Stir in the pumpkin and white wine, cook 2 minutes, add salt and pepper and remove from heat.
Make the Bechamel: Melt the butter in a medium sized sauce pan over medium high heat.  Add the flour and whisk until smooth, cook stirring constantly. Gradually whisk in the chicken broth, then the light cream, stirring constantly until smooth and thickened, about 20 minutes. Stir in the parmesan and season with nutmeg, salt and pepper.
Stir 1/2 cup of the hot sauce into the beaten eggs in a small bowl (this prevents them from curdling when you add them) then add the egg mixture to the remaining sauce, cook another 2 minutes and remove from the heat.
Assemble the lasagna:  Spoon a small amount of sauce into the pan just to coat the bottom. Make a layer of noodles on the bottom, layer on 1/2 of the prosciutto, 1/3 of the bechamel, & 1/2 of the sage leaves.
Make another layer of noodles, add all of the pumpkin, layer 1 cup of parmesan, & 1 cup of the walnuts. Make another layer of noodles, add rest of the prosciutto, 1/3 of the bechamel, rest of the sage leaves.
Make another layer of noodles and top with 1 cup of parmesan.
Bake until lightly browned and bubbling, about 60 minutes.

*Note: You can freeze this lasagna also! Bake for 30 minutes, cool, and cover tightly with foil. When ready to serve allow it to defrost and bake 30 minutes at 350 to heat through.


Monday, December 30, 2013

The 12 Shops of Christmas: PeachyMe

Hey kids! If you are anything like me (that is, struggling to recover from Christmas cookie comas, still tripping over scraps of wrapping paper, and seriously considering a January cleanse) you are just about done with the holidays. At a full week away from home, we are beginning to chomp at the bit here. All of the holiday visiting, hustling and bustling is so much fun, but you know how tired you can feel after a vacation! Luckily, a teensy bit of personal pampering is a great way to relieve some of the post holiday blues.

Hopefully someone in your family was thoughtful enough to slip an Etsy gift card into your stocking, or even a few dollars in cold cash. If so, you'll be looking for someplace to spend it. Look past those little nagging things around the house that need replacing, and take a peek at your closet. Today's featured shop is a great place to find a unique piece to update that wardrobe for the New Year and in an affordable way (because after all the gift giving, we all need to save a bit of money!).

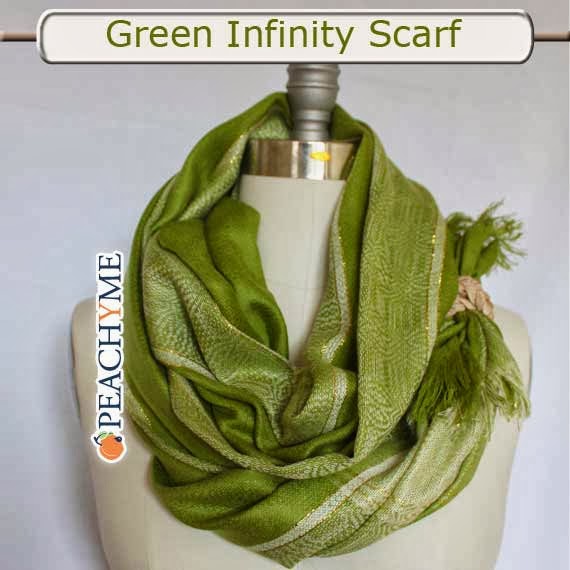
PeachyMe is a small fashion and accessory shop created by a couple in Fair Lawn, New Jersey: Cecilia and Steven. They make lovely one of a kind shirts and scarves, perfect for adding a little bit of something new to a tired wardrobe. Personally, my pick is their infinity scarf in green. I have a few scarves, but I wear the same tired scarf every day. I need to update! This color is lovely, and I don't
have anything green. Plus, that bit of sparkle is so pretty! It comes in a variety of colors, so go snatch one up before they are gone!

Please tell us a little about  you and your products.
n many design projects. PeachyMe mainly focuses on women's clothing. We use a both new and refashioned materials. In addition to clothing, we design materials for print and web.

How would you describe the mission/purpose of your business?

PeachyMe offers unique pieces made by hand in our home. Many pieces are one or two of a kind. Our mission is to make each person wearing our clothing feel unique.

How did you get started as a creative business owner?

Both Steven and I started our creative journey at a very young age. Steven majored in graphic design in college and I majored in fashion design. PeachyMe brings both of our passions together.

What is your favorite part of running a creative  business? The biggest challenge?


 Our favorite part is though process that come before completing a project, from sketching to making our own patterns to actually sewing the very first stitch. We enjoy collaborating on ideas in any project we do.

The biggest challenge we had was not having the proper space to design in. We were originally designing from our small apartment where we had to pack up any project we ere working on ever night. Having limited space was very challenging. We recently moved to a new place where we have a dedicated fashion room. We hope to create many new designs for the summer.

What is the best gift in your shop? Who is it for?

The best gift in our shop are our scarves. We created these scarves using material we brought back from our trip to Ecuador and sewed to create the different styles. These scarves are great gifts for women.

Saturday, December 21, 2013

The 12 Shops of Christmas #10: Brittany Lauren Design


Hey Folks! We are nearing the end of the holiday shopping mania, so there are only a few shops left to feature! While most of them have been almost neighbors (folks within Bergen County) the owner of this featured shop actually is my neighbor. Like, I could walk to her house. For realz. Oddly, Miss Brittany Lauren of Brittany Lauren Design and I have never actually met. I imagine that will likely change, this being a small town and both of use having little ones pretty close in age! The toddler park and lakeside mini beach make it pretty easy to run into local mamas when you have a toddler to occupy all summer long!

Brittany is a graphic designer with a wide range of goods in her shop, from iPhone cases and notepads to serving trays and mugs. She has so many wonderful personalized gifts to choose from, but I think her monogrammed apple mug is just perfect for a teacher! Fill it with some sweets, add a set of my seed paper apple note cards, and you are good to go.

Please read on to learn more about Brittany and score a coupon code for her shop!

Please tell us a little about you and your products.

Hi there! My name is Brittany Lauren, and my business is full of heart. I have a background in graphic design and graduated from Ramapo College in 2008. My inspiration for my shop is fueled by childhood memories of sailing on the Hudson River with my family, vacationing in Maine and ferry rides to Nantucket. I love the salty air, the sand between my toes and the serenity that the sea brings me. I adore all of the treasures of the ocean, but my real catches are my husband of three years, Mike, and my baby boy, Benny (my little fish!), born this past June! My business, Brittany Lauren Design is born of salt and sea. In 2010, I was diagnosed with Lyme disease and began looking for a creative outlet while I recovered. My passion quickly turned into my dream, and I said goodbye to my corporate job to start my own business that specializes in personalized stationery and fine gifts. I am proud to write that we exclusively print in the U.S.A. and use the finest materials and paper. Every item is crafted with love. I love capturing the magic of summertime fun and I hope my designs bring you as much happiness as they do for me. I’m so excited to create a unique and personalized experience for clients!


How would you describe the mission/purpose of your business?
I love designing and making something special for someone. My favorite part is working with a customer and learning more about them and why they are purchasing. From buying their first home and needing a personalized stamp or buying a mug for their child's favorite teacher. I love to create happiness. 

How did you get started as a creative business owner?


I worked in the cooperate world for 5 years before following my dreams of starting my stationery and gifts shop full-time. I googled and googled for a long time while I was moonlighting at night to find answers. In the morning I'd commute to my advertising job, during lunch break I'd mail packages or make proofs. My passion for design fueled my heart to keep going. 

What is your favorite part of running a creative business? The biggest challenge?
My favorite part is making a unique experience for my clients. I love to bring joy into their mailbox! The biggest challenge is the non creative part of my job. I had to learn the not so fun side that doesn't come easy to me like accounting and book keeping. 

What is the best gift in your shop? Who is it for?
Hands down our stamps! I love them! Bonus they all are handcrafted in the USA! Our stamps have so many uses from using them as a return address stamp or turning them into a stamp you can use for a wedding. 


I'd love to offer your readers a 20% discount using code JOJOBEAN


Thursday, December 19, 2013

The 12 Shops of Christmas #9: Dymant Designs

  • I'm so glad to introduce you all to Pam of Dymant Designs, the lovely lady who gave me the kick in the pants I needed to get involved in our local farmer's market this summer. We first met at the Etsy Craft Party in June, and she has been a great source of inspiration in all things crafty biz related since then. Pam makes beautiful sewn items, housewares, and gifts, and you can probably find something in her shop for every person on your list. From pillows and baby bibs to personalized cutting boards and pie plates, she's got you covered. 
  • My favorite gift? This set of engraved wooden utensils and cutting board, perfect for any family, but especially for anyone newly married. For Xmas, I'd pair it with his and hers holiday aprons and a copy of The Newlywed Kitchen, because I'm cheesy like that.

  • Please tell us a little about you and your products: My name is Pamella Clark, I am a wife, printer, photographer, designer, craft maker, and the owner of Dymant Designs. I find serenity from the hustle and bustle of the day by rolling up my sleeves to make something unique.
  • When my husband, a US Marine, left for Afghanistan in 2011, I decided to teach myself to sew to help pass the time. When I told my grandmother what I was doing she laughed and said I am just like my grandfather, always needing to tinker and stay busy. My sewing studio is his old workshop, working there makes me think about all the time I spent with him while he too was tinkering and staying busy. Dymant Designs is named after my late grandfather, Sam Dymant, his strong morals are stitched into everything we do.
  • Our products are fun and functional. We sew whimsical owls that are hot and cold packs, pay homage to yester-year with hanging kitchen towels, adorned with vintage buttons, memorialize childhood memories with custom pillows printed with old scans of postcards, and take ordinary kitchenwares and transform them into custom pieces of usable art. We don’t have a finite product line. We love creating custom products that is special for each recipient to love.
  • How would you describe the mission/purpose of your business? Dymant Designs is a lifestyle company. Our mission is to take ordinary useful objects and make them unique without loosing functionality. We help you live in an more organized harmonious state, and share that serenity with others. Pick out a gift that is custom engraved to make the recipient feel special, drop off a pie with a hanging towel to make the host feel loved, bring over an owlie for your cousin who is accident prone all little tokens that show you care.
  • How did you get started as a creative business owner?
    When I learned how to sew, it wasn’t my intent to start a business. But as time has gone on, the plan and direction just laid itself out in front of me. It is amazing being a small business owner, and having the ability to spend time being a maker. I love every second of designing creations for lasering, or chugging along behind a sewing machine. However, every second is also the biggest challenge. Time is ever fleeting.
  • What is the best gift in your shop? Who is it for? I would say that in my shop right now, my favorite gifts are for friends and hostesses. We make these beautifully custom engraved / monogrammed wooden utensils and cutting boards. They make a great gift set for almost anyone. (Pair them with Lees Bees Honey for an extra sweet touch)
  • For kids and stocking stuffers, you cannot go wrong with an Owie the Owl! They are just so darn cute!
  • SHOPSofCHRISTMAS lands you a spiffy 10% discount on any of our handmade items.
  • You can find and follow Pam on Facebook here: https://www.facebook.com/DymantDesigns

Monday, December 16, 2013

The 12 Shops of Christmas #8: OhYum!

I can't believe it. Two weeks until Christmas and I just finished my holiday shopping TODAY. Thank goodness. Now to wrap, and ship, and bake, and pack until it is finally time to go celebrate! I've been super busy crafting up a storm here, and doing some totally insane things like showcasing my goods at Whole Foods (more on that later...). I have also been doing a teeny bit of holiday pampering, thanks to the lovely Kathy from OhYum, a shop full of treats for your skin. 

I first met Kathy when her adorable daughters came to craft hour at the farmer's market this summer, and after a bit of chatting I found out she was an Etsy seller as well. It wasn't long before we were both vending at the same event and I got to sample some of her delicious goodies. She gave me an incredible honey lip balm that Jude keeps running off with, and I bought my favorite gift for my cousin's birthday. Kathy's sugar scrub cubes are genius. Moisterizing sugar scrubs in single portion cubes that melt in your hands and smell good enough to eat! I chose the Buttercream scent for my cousin Libby and paired it with the matching body butter. For a busy mom of two it was a great little gift for some pampering in the shower. The scrub is exfoliating and moisturizing at once, so you don't even need to put on lotion after you shower on those days when you are in a hurry (and face it, if you are chasing kids and working and running a household, that's every second of every day). For those rare days that you actually have a spare three minutes, the body butter is a luscious layer of extra scent. Because who wouldn't want to smell like buttercream all day? Read on to learn more about Kathy and her products, and don't forget to 'Like' her Facebook page for shop updates!

Please tell us a little about you and your products.

My name is Kathy, I'm a stay at home mom. I have always been a creative type of person. Where some people have a compulsion to clean, I have a compulsion to create. I soap, cook, sew, knit, crochet and photograph. 

How would you describe the mission/purpose of your business?
I want to enrich people's lives through scent memory. Scent is the sense that is most strongly tied to memory. Each fragrance I carry has a story. That story is different for each person who smells it. When I work with my bubblegum fragrance, I'm reminded of a time in my childhood where I would bicycle to the corner store and buy bubblegum in long strips like tape. I used to see if I could chew the entire roll of bubble-tape at one time. I use fragrances to remind people of the joys they have experienced. 

How did you get started as a creative business owner?
Originally when I started OhYum I was selling gourmet flavored marshmallows. I had made marshmallows many times before and several of my friends kept insisting I sell them. During that time I joined several teams and participated in some exchanges, Secret Santas and things like that. When I sent out my soaps, I frequently got feedback asking where they could buy more. Peer pressure lead me to introducing them to my shop. They quickly overtook my marshmallows. I've been up to my eyeballs in soap ever since and loving every single minute of it!

What is your favorite part of running a creative business? The biggest challenge?
My favorite part is when a customer comes to me with a request and I get to play and blend something just for them. Creating something unique always makes me happy. 


The biggest challenge is the paperwork. I have to regularly schedule time to update the spreadsheets I created to track my sales and expenses. Like many creative business owners I want to create, I don't want to be tethered to spreadsheets all the time. Making a point to do it regularly has made a huge difference in how easy it is to get done. 

What is the best gift in your shop? Who is it for? 
The most popular item in the shop right now is the sugar scrub cubes. These single serving scrubs are made with solid oils that melt with the heat of your shower and your body. The sugar exfoliates dead skin. Mango butter and coconut oil moisturize your skin without leaving your shower a slippery mess. They are also a great quick manicure for tired hands. 

I created a special coupon code: jojobean for 15% off any purchase. 

You can find me on facebook at 
www.facebook.com/OhYum

Wednesday, December 11, 2013

The 12 Shops of Christmas #7: Pinkapotamus

I'm so excited to introduce all of you to my newest shop crush, Amie from Pinkapotamus! I met Amie last week at the West Side Holiday Market, and she is such a creative mama! She is a bit of a jack of all trades, and her shop is full of adorable sewn and hand painted items for kiddos, from dress up to decor. I could easily have bought ten things from her table at the market to add to my holiday gift list! I spent more than I made that day (but it's ok! It all helped me meet my Handmade Holiday goal!).

My perfect girl gift from Amie's shop is this adorable crown. She had so many of them at her table in a variety of fabrics and colors. I love them for dress up, for a photo shoot, or for a birthday party! As a holiday gift I would pair this crown with a little handmade cape and scepter, and one of my favorite books, The Paper Bag Princess. Every little girl needs to know how bad-ass she is, well dressed or not. 

My favorite boy gift from Amie's shop is for the art lover. These little art displays are genius. Amie can custom make them with any theme or color for your kiddo's playroom or bedroom! This dino themed display would be an awesome gift, paired with some new crayons or paints, a smock and pad of art paper. The little Picasso in your life would love it!

Read on to learn more about Pinkapotamus and don't forget the coupon code at the end of Amie's interview!

Please tell us a little about you and your products.
My name is Amie Irwin and I am the owner of Pinkapotamus. My shop specializes in unique and whimsical children's decor and fun accessories.


How would you describe the mission/purpose of your business?
My mission for my business is to provide fun products to brighten up any child's decor. Childhood should be fun and I think that your nursery or bedroom should reflect that. 


How did you get started as a creative business owner? 
I got started as a creative business owner after realizing how much enjoyment I got out of creating one a kind, personalized items for my children's friends.

What is your favorite part of running a creative business? The biggest challenge?
My favorite part of being a creative business owner is that I love what I do. I get to be creative every day and share that with my customers. The biggest challenge is juggling everything. I am a stay at home mommy to three lovely little ones, with a hubby, a house, friends and lots of obligations, so sometimes it is hard to find the time to balance it all!

What is the best gift in your shop? Who is it for? 
The best gift for a new baby in my shop are my newly created custom name signs. They can be created to match any decor and personality!


The best gift for kids in my shop are the boys art display holders. They provide a great way to showcase all of the fun art projects that come home from school!


The best gift for kids who love to play dress up are my crowns and super hero capes. They bring fun to any imagination game!


Where can readers find you?
My blog is http://pinkapotamus.blogspot.com/
My Facebook is: www.facebook.com/pages/Pinkapotamus/149764835083046
And my Pinterest is: www.pinterest.com/amieann


Amie is also sweet enough to offer a coupon code for all of you lovelies! Get 15% off in her shop with the code JOJOBEAN.